OIDC
Prerequisites
Create the company
Email addresses and names of the users to be added. The person to be added will be registered first. This will be done in a meeting.
Application
Add Application to Company
In the “Applications” section you can see all the protected services that have been added to Ironchip and their features. To add a service, click on “New Application”, which will open a new window.
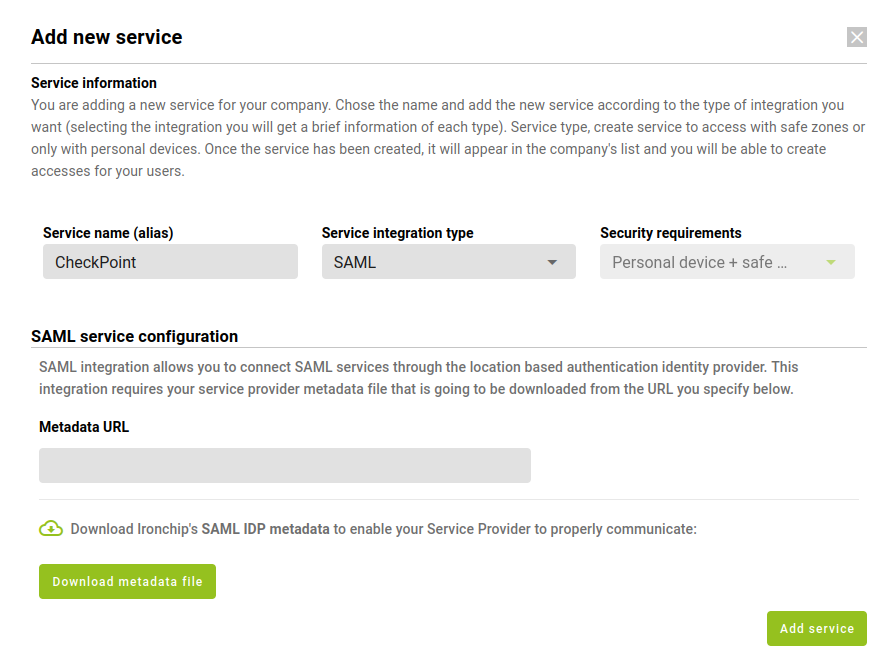
In the new window you will have to choose the new service, it may be one of those that appear on the list or a personalized service, for which you will click on “Custom Application”. A new window will open.
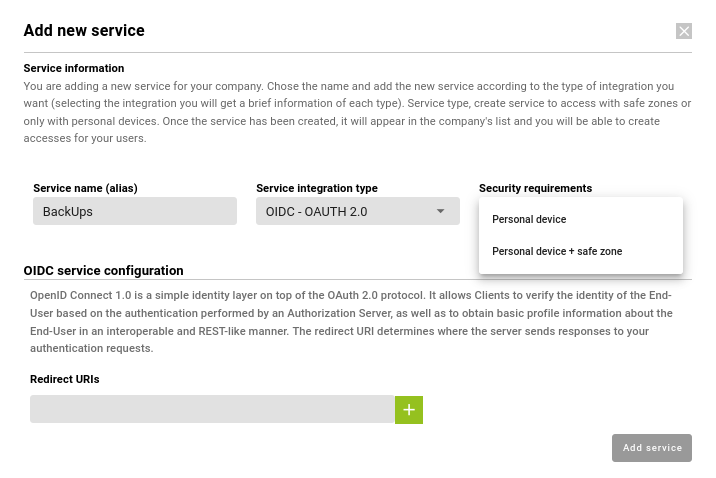
In this you will have to enter the data of the new service, if you have chosen one from the list the name will come by default otherwise you will have to enter it. In addition, the type of integration is OIDC and the security requirements. The latter can be of two types which will be used to access the selected service:
- Personal device
- Personal device + safe zone
When choosing OIDC a Redirect URI will be required. To obtain it we must look for its path in the service we want to integrate.
When all the fields are filled in, press “Add Service” and the service can be seen in the corresponding section.
Important: Save the fields that are returned when creating a service, in this case, “Client ID” and “Client Secret”. These will only appear this time and will need to be entered into the service.
Application Access
Add User to created Service
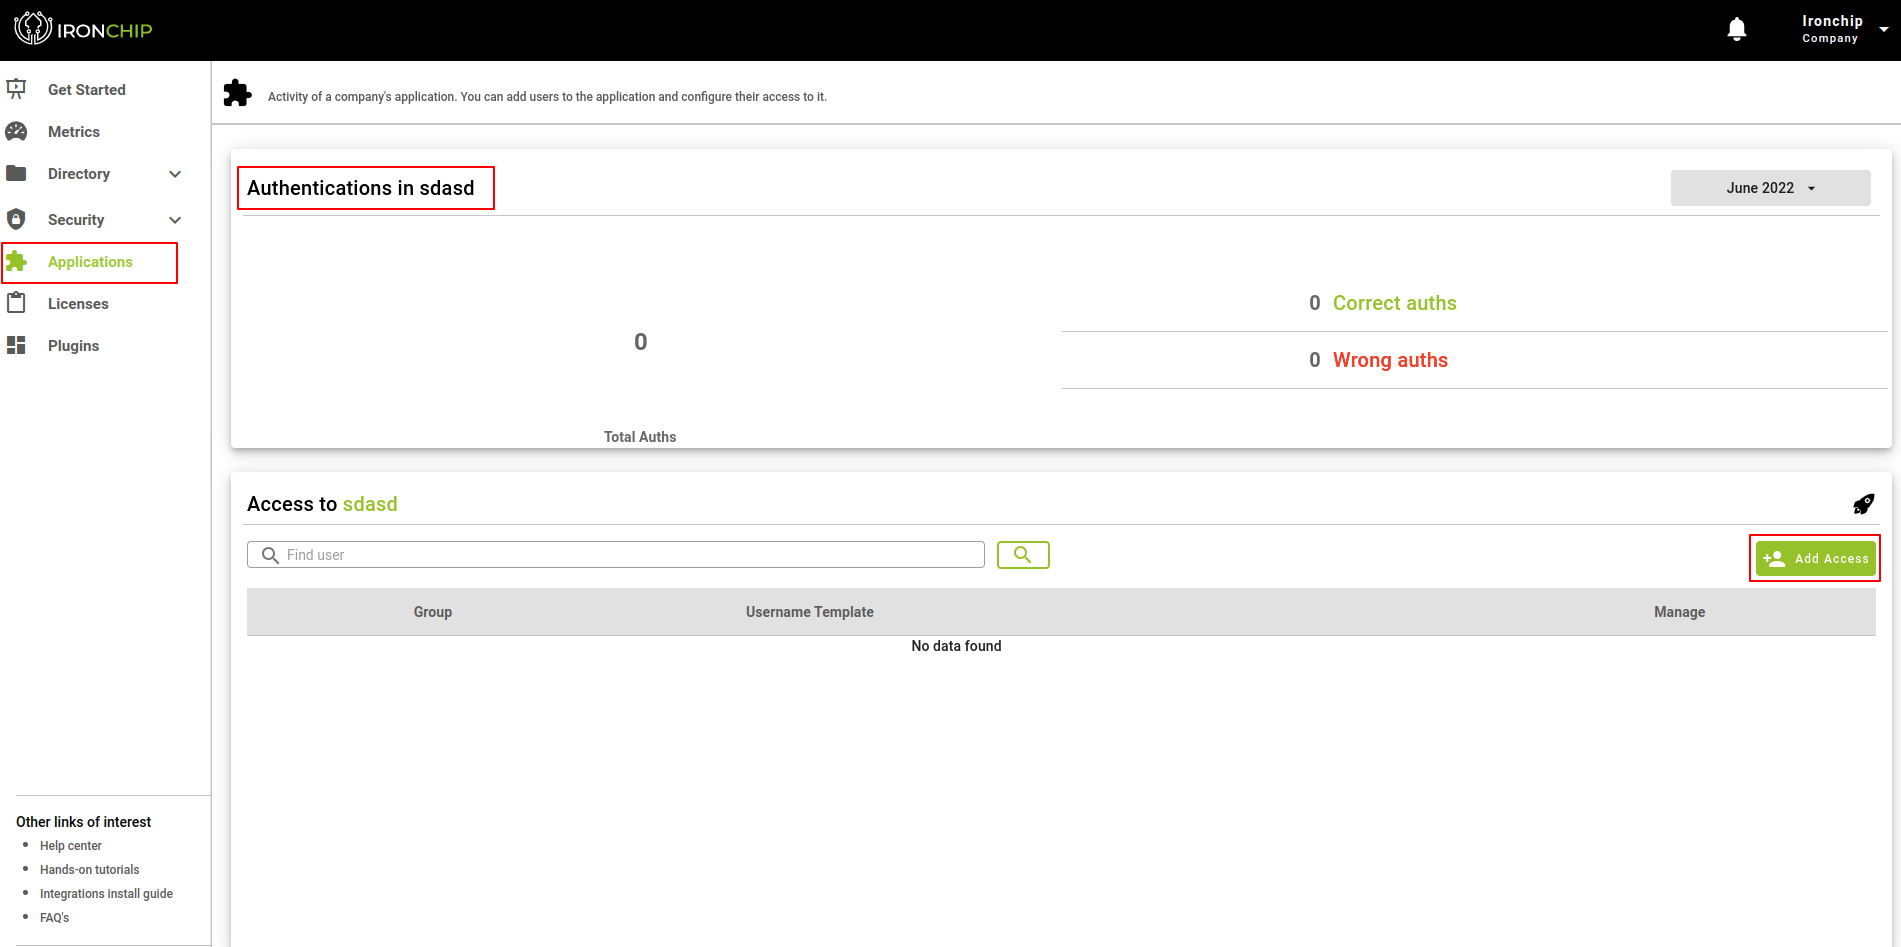
To add a user to service, start from the Applications section, where you will select the service to which you want to add one or more users. Once on the application’s information page, you will be able to see data such as the number of successful and unsuccessful authentications to access the application.You will also be able to see a list of all the groups to which access has already been generated.
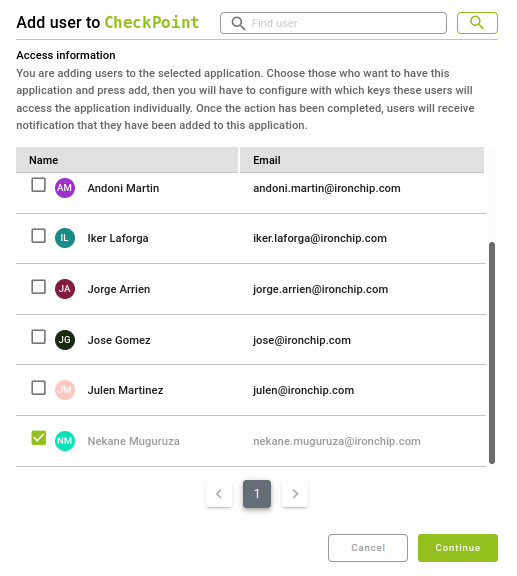
To give new access, we have a button Add Accesses, when you press it a new window will be displayed with the 5 steps involved in the process, the first step will be to select the group of users to which we want to give access to the application, for this, we have a list of all the groups that are created so far in the company. To select the desired group or groups, simply click on the checkbox to the left of each group name.
Note: It is important to specify that this section will only be able to add groups of users, in this way the individual users are treated as a user within their own personal group, a group that will have its own name.
Click the Continue button to access the next step of the process.
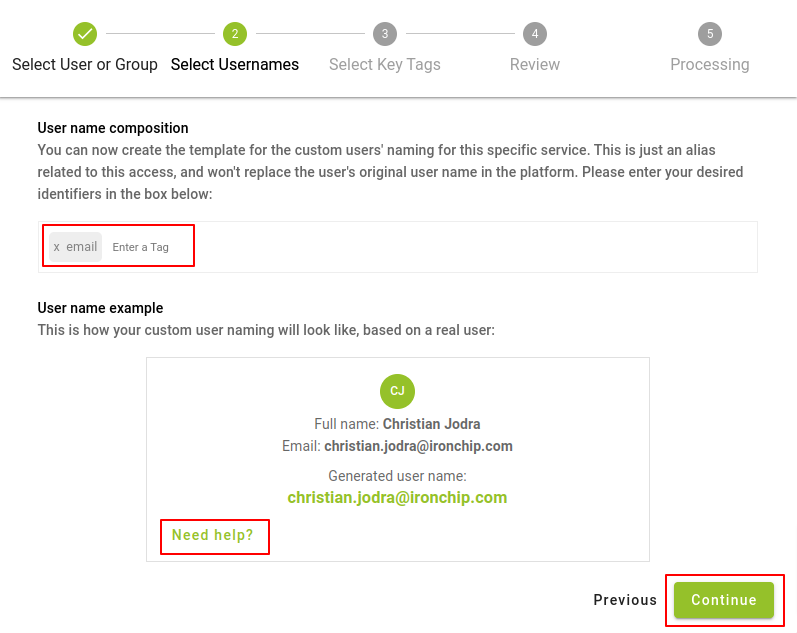
In the next tab, you will proceed to choose the username format that all the users you are adding to the application will have. By default the Email will be selected, however, there are a series of labels (name, surname, domain, etc) that will allow you to build the format that best suits your requirements, to access them you will have to click on the area where it indicates Enter Label.
Note: In case of doubts, you have a help block located at the back of the example, click on Need Help to access it.
After choosing the desired format, click on Continue.
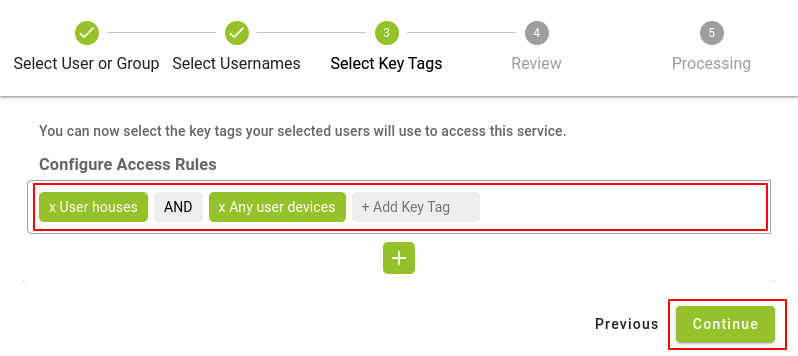
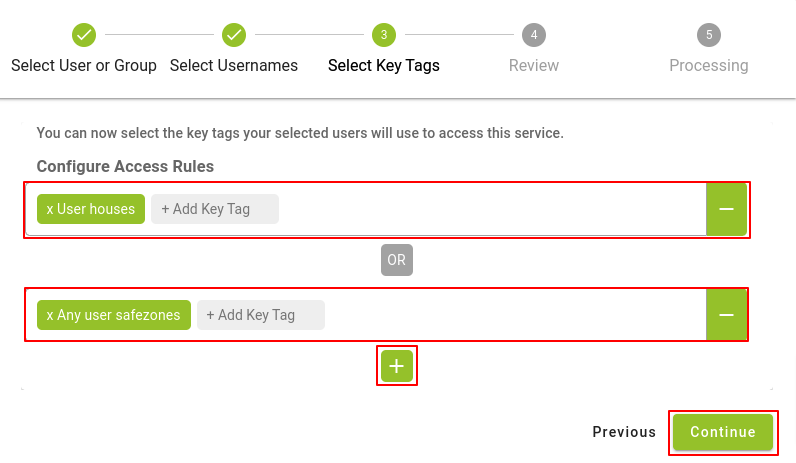
The next step will be to select the Key tags that we will assign to the chosen group, we will have the option to choose combinations of key tags by selecting more than one key tag on the same line and then click on the “Continue” button.
To distinguish between one or the other key tag option, click on the "+" button and choose the desired key tag in the text field. If in the process you doubt your choice, you can use the "-" button located to the right of the field to delete that line of key tags.
Once you have selected the desired key tag or combinations, click on the Continue button.
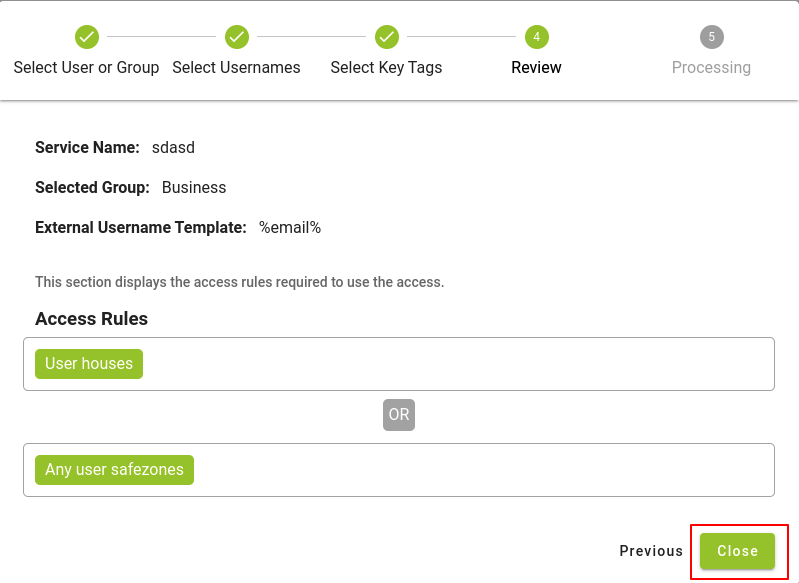
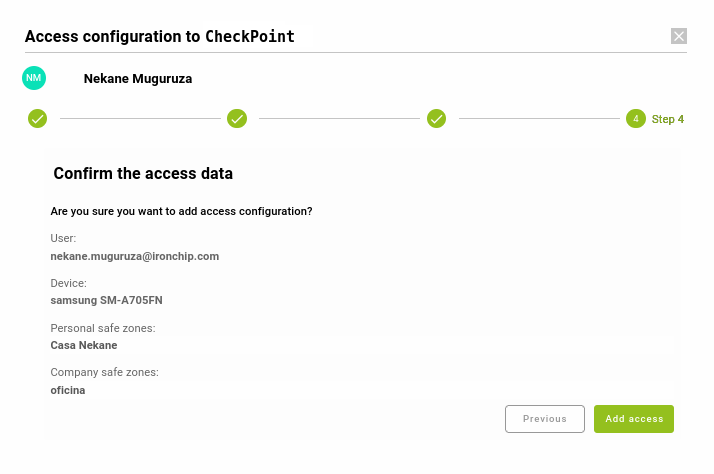
In the following window, we will see a summary of all the data that in the previous steps have been selected, after reading them carefully we press the Close button and the access creation process will start.
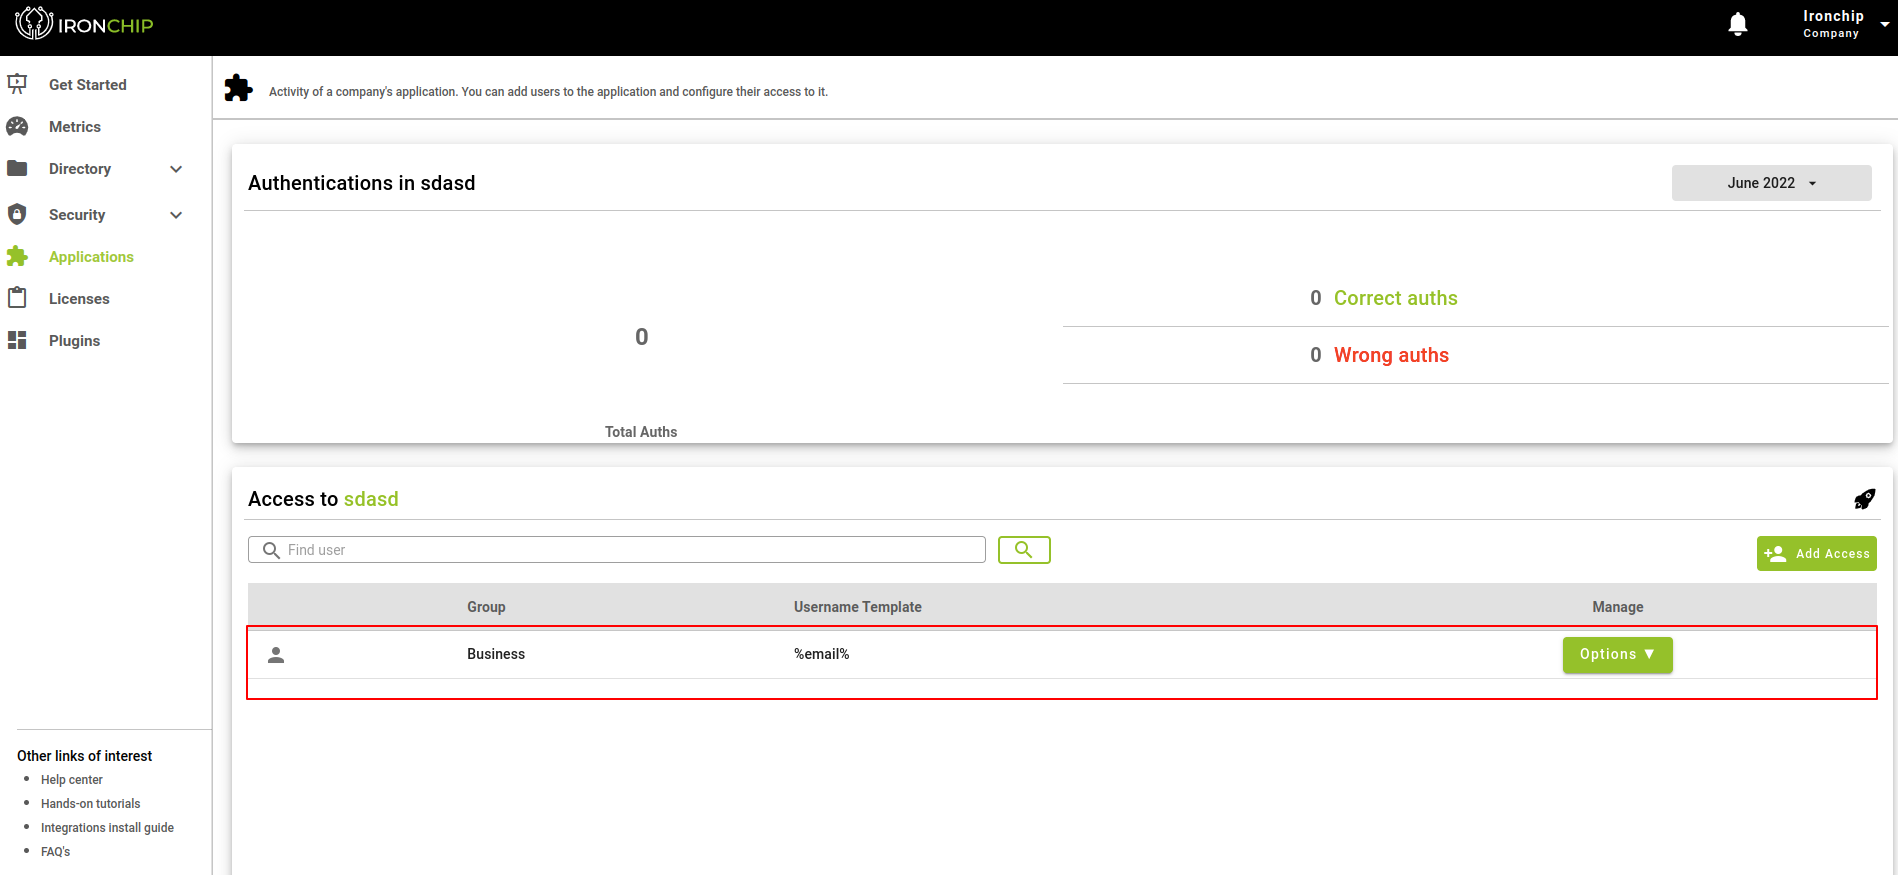
A few seconds later, if everything goes correctly, we will see the access we have added on the main screen. This access can be managed at any time by pressing the Options button.

SAML
Prerequisites
Create the company
Email addresses and names of the users to be added. The person to be added will be registered first. This will be done in a meeting.
SAML Attributes supported
Currently, the following fields are supported:
Description Friendly Name SAML Name User Name uid urn:oid:0.9.2342.19200300.100.1.1 User Email urn:oid:0.9.2342.19200300.100.1.3 User given Name givenName urn:oid:2.5.4.42 User common Name cn urn:oid:2.5.4.3 Application
Add Application to Company
In the “Applications” section you can see all the protected services that have been added to Ironchip and their features. To add a service, click on “New Application”, which will open a new window.
In the new window you will have to choose the new service, it may be one of those that appear on the list or a personalized service, for which you will click on “Custom Application”. A new window will open.
In this you will have to enter the data of the new service, if you have chosen one from the list the name will come by default otherwise you will have to enter it. In addition, the type of integration is SAML and the security requirements. The latter can be of two types which will be used to access the selected service:
- Personal device
- Personal device + safe zone
When choosing SAML a metadata document of the service to be protected or the public URL of that document will be required, this is in the configuration of the simulation platform; more specifically it is the Metadata public URL field.
When all the fields are filled in you will click Add Service and the service will be visible in the corresponding section.
Important: Save the fields that are returned when creating a service, in this case, “Client ID” and “Client Secret”. These will only appear this time and will need to be entered into the simulation platform settings.
Application Access
Add User to created Service
To add a user to a service, start from the “Applications” section, select the service to which you want to add one or more users. Once in the information page of a service, click on Add User in the “Users with access to …” card.
In the opened window select the user(s) you want to add and click on Continue.
The next step is to configure access to the service. To do this, the following steps will be followed:
The user name should be the same as the one created in the account in the previous section.
- Verify the username and security requirements, the first one is modified by clicking on the pencil icon. Click on Continue.
- Select the personal device to be used for the authentication process. Click on Continue.
- Select the secure zones both personal and shared that will be used to access the selected service. Click Continue.
- Verify all the configuration previously selected and click Add Access.
The user will have been added to the service with the selected configuration. This can be changed at any time.
RDP
Prerequisites
Create the company
Email addresses and names of the users to be added. The person to be added will be registered first. This will be done in a meeting.
Active Directory
Active Directory Activation and Configuration
For the activation and configuration of the active directory we will use the Server Manager in which we will access the Add Roles and Feature section, in this section we will add different roles:
- Active Directory Domain Services
- DHCP Services
- DNS Services
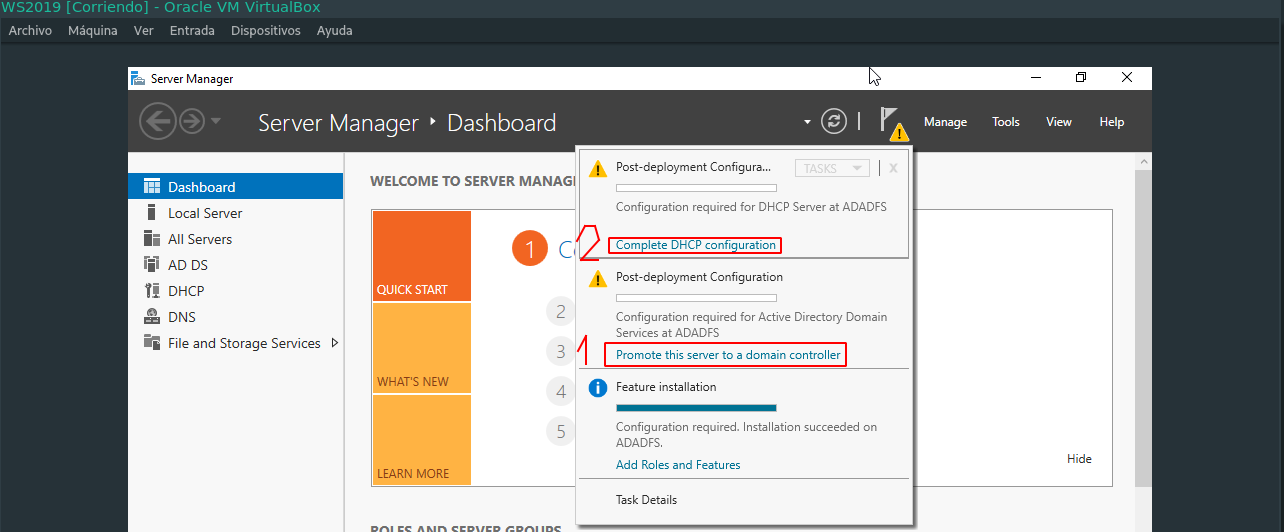
Follow this window by clicking on Next until you reach the end. When this happens, you will see a loading bar. When we have returned to the main page of the Server Manager we should notice that in the left menu the 3 previously selected roles have been added. In addition, 2 alerts will appear in the top menu.
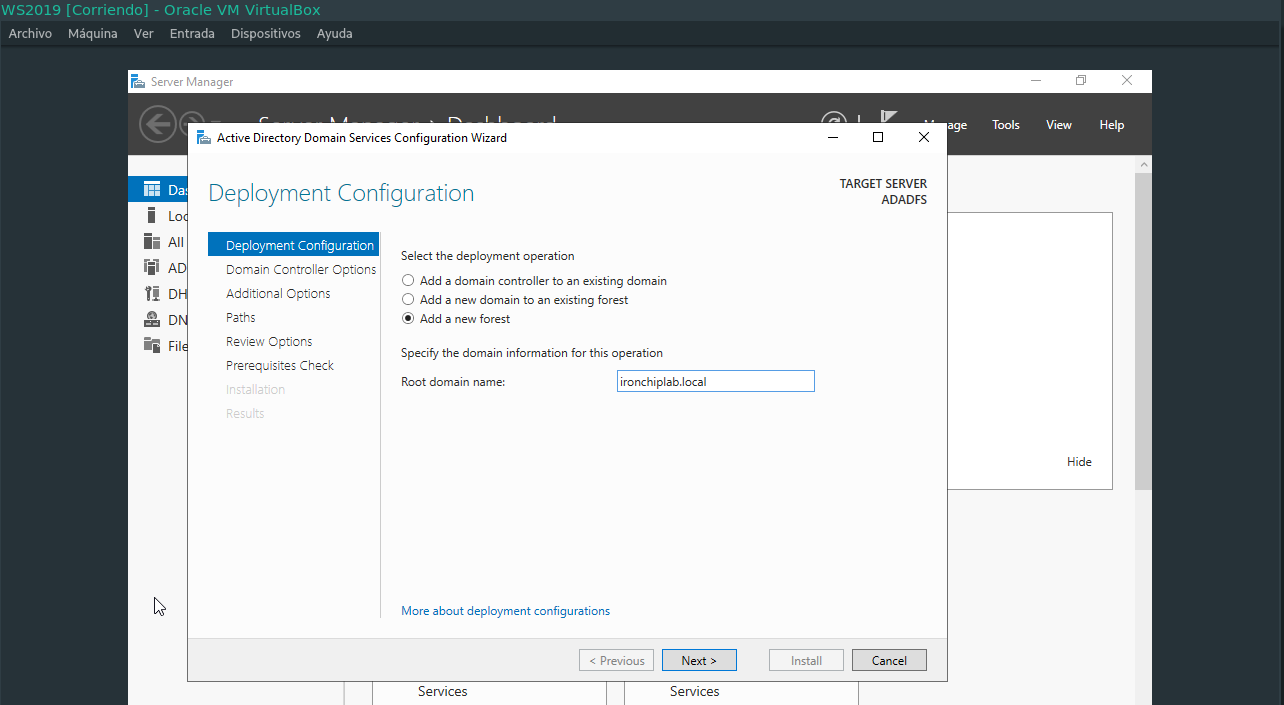
First click on number 1 Promote this server to a domain controller. In this open tab, select Add a new forest and enter the desired domain name. Follow all the steps until you reach the end and click on the Install button. After completing this, you will receive another alert about the DNS which will be resolved later.
DHCP & DNS
DHCP and DNS Configuration
DHCP, alert number 2 will set the default configuration; simply click Next until you reach the end.
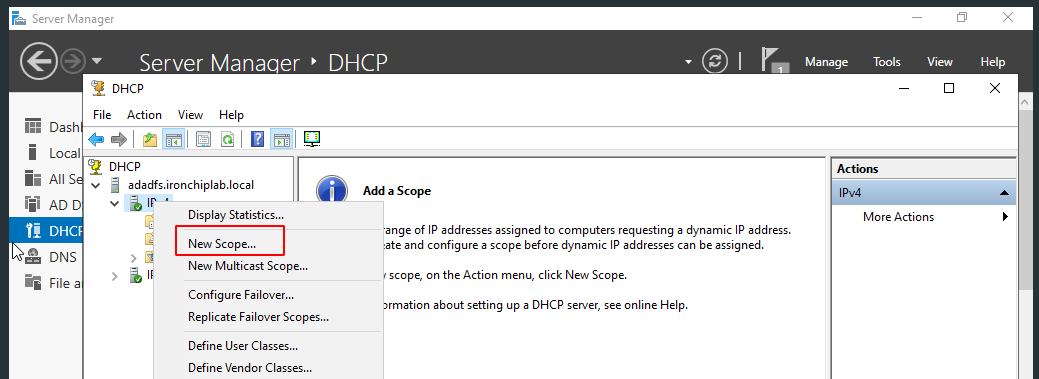
After the default configuration, access the DHCP program from the administrative tools. Right-click on IPv4 to get to New Scope…, enter a range of IPs. For example: 192.168.11.50 to 192.168.11.100. And the rest of the configuration can be the default, so click on the Finish button to finish the configuration.
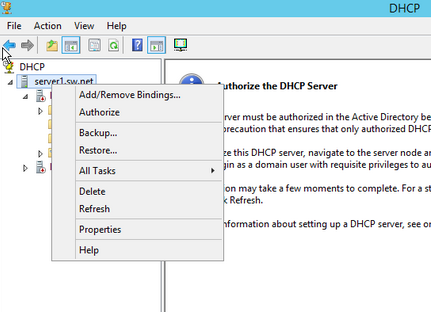
Finally, right-click on the server name under DHCP and click on the Authorize button. If you refresh the page, you will see that in IPv4 the symbol that was red is now green.
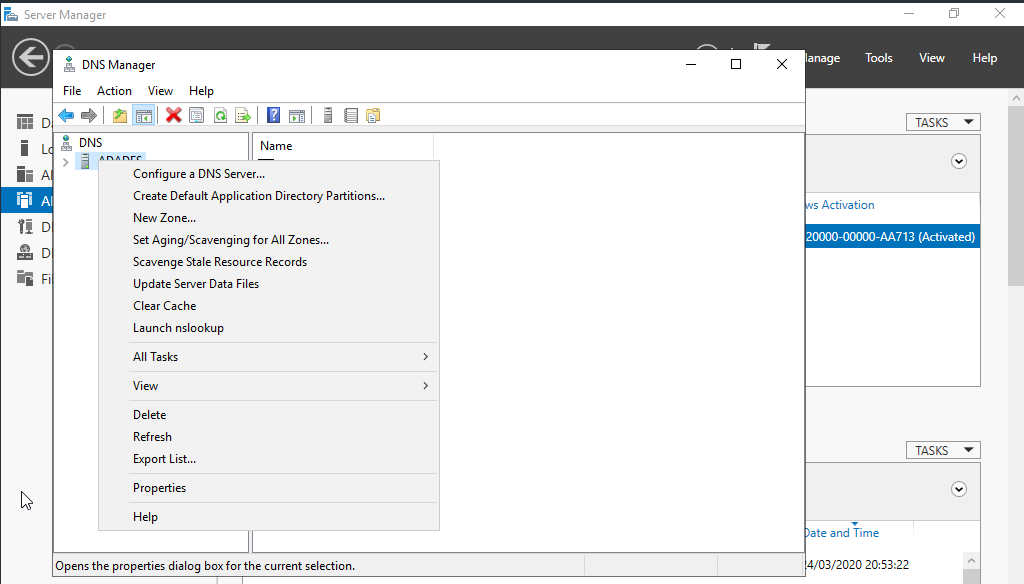
DNS , a forwarding mechanism needs to be added.
From the administrative tools you will open the program for DNS configuration. Right-click on ADADFS to get to Properties.
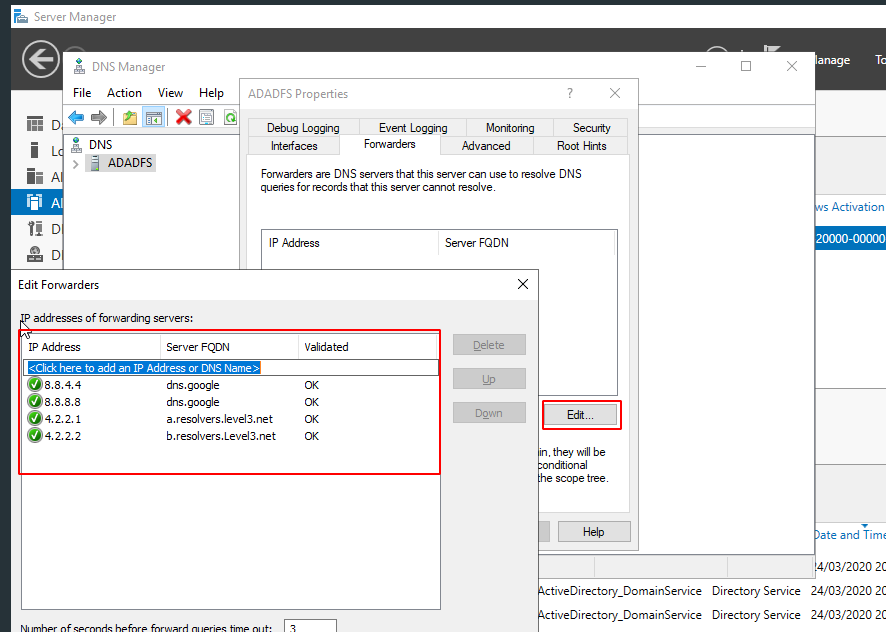
Click on the Forwarders section and add the external DNS servers that are necessary, such as 4.2.2.1, 4.2.2.2.2, 8.8.8.8 and 8.8.4.4.
Remote Desktop Protocol
RDP Activation and Configuration
The next step is to activate RDP on the 2 machines, this can be done in different ways.
The following procedure shall be followed for the normal machine:
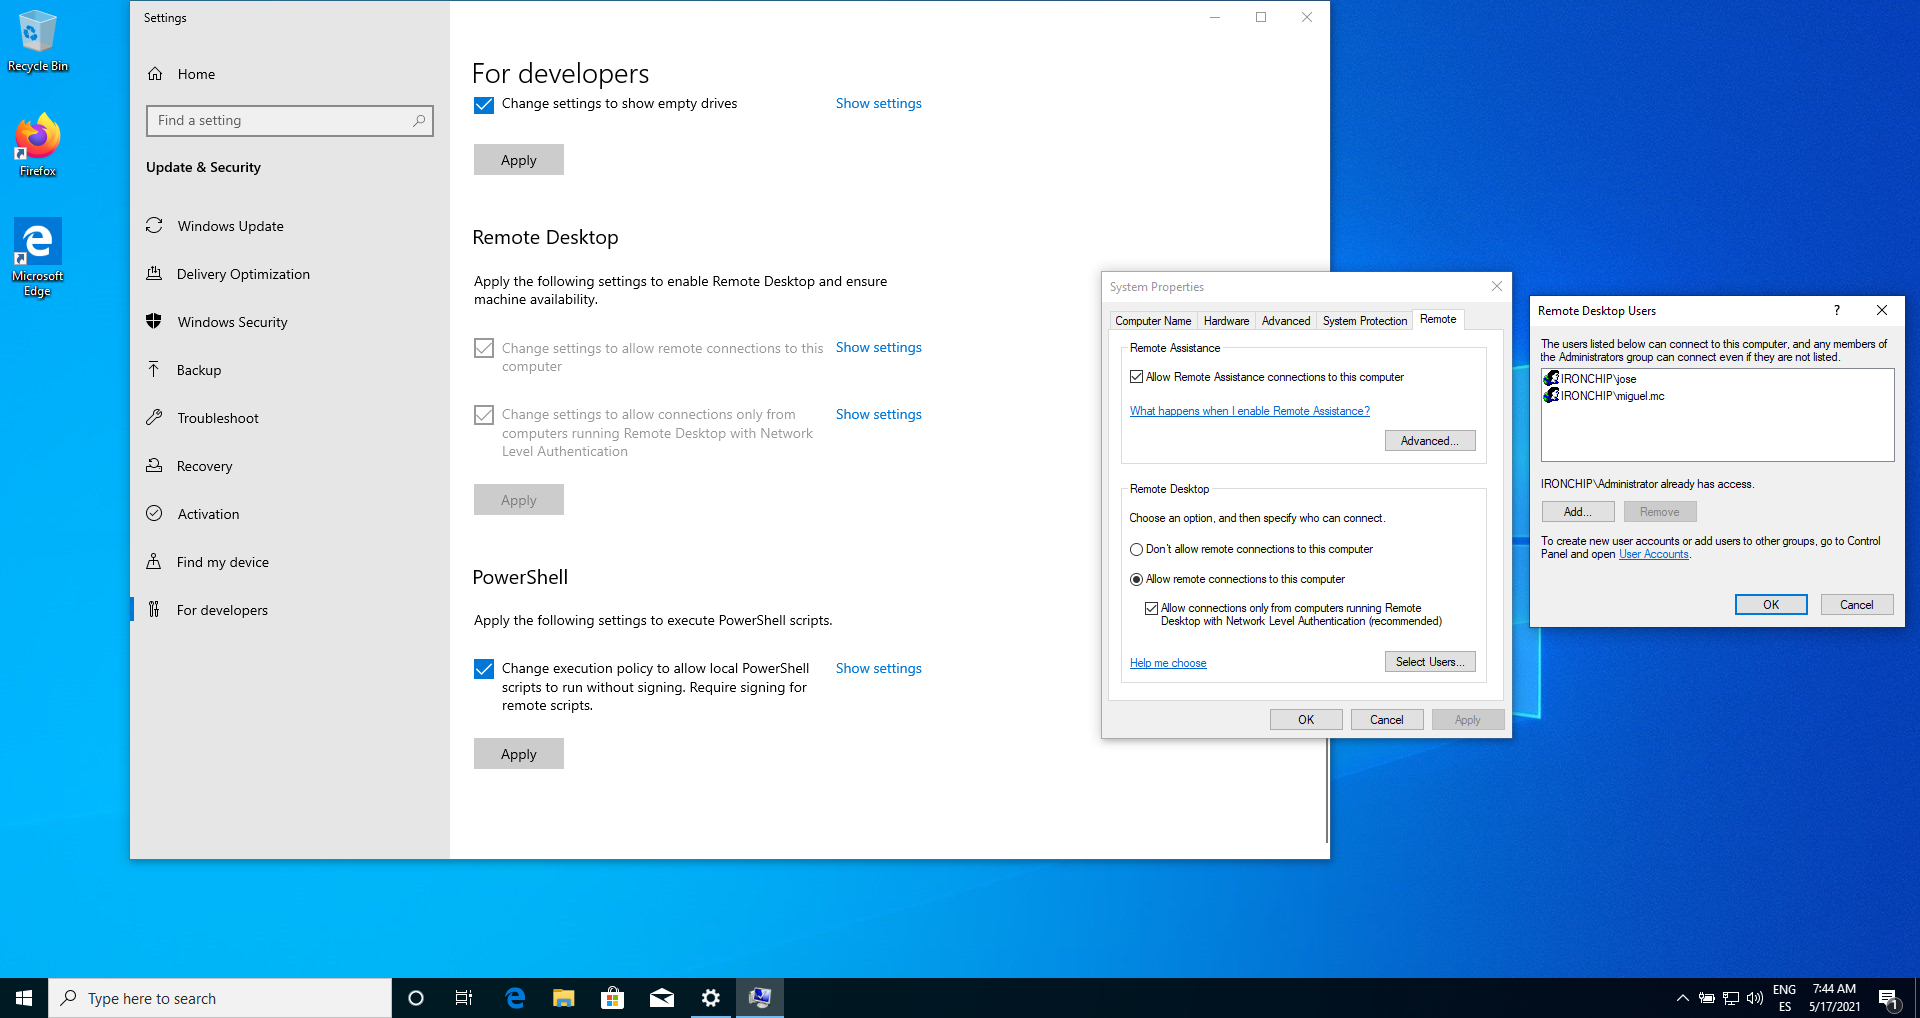
From Start, go to the Developers settings and on this page click on the Allow remote connections button.
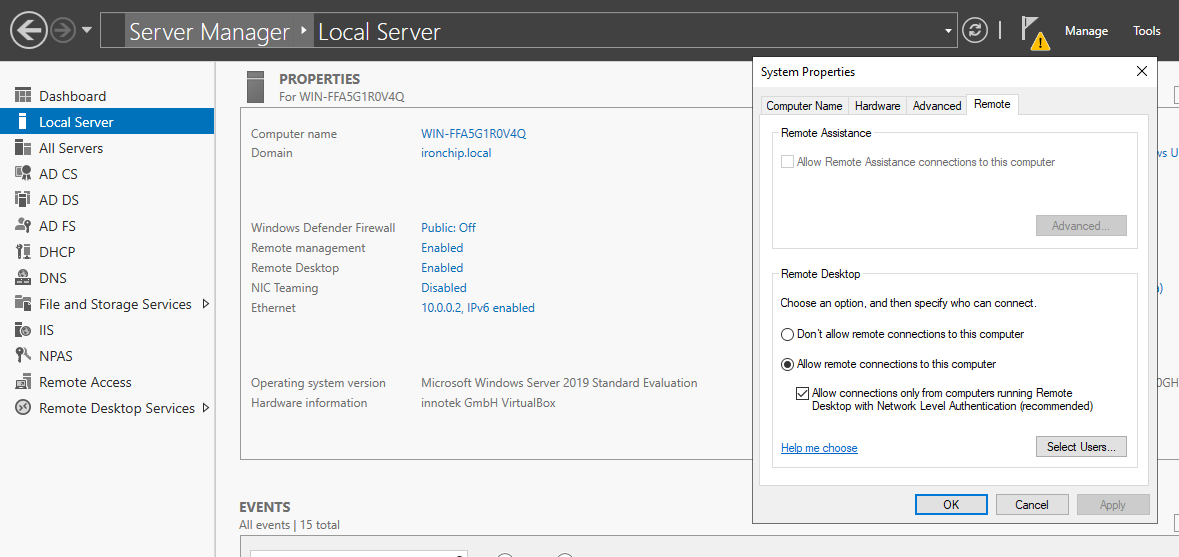
On the server, however, it will have to be done from the Server Manager, if it has not been possible to do it in the first way:
In the Local Server section, all the properties will appear, including Remote Desktop. Click on Disabled, a menu will appear in which you must select Allow remote connections to this computer, and click on Apply. In addition to that, in the section that opens by clicking on Select Users… you will have to select which users will be allowed to access the server.
Note: If no user has been created yet, it must be created.
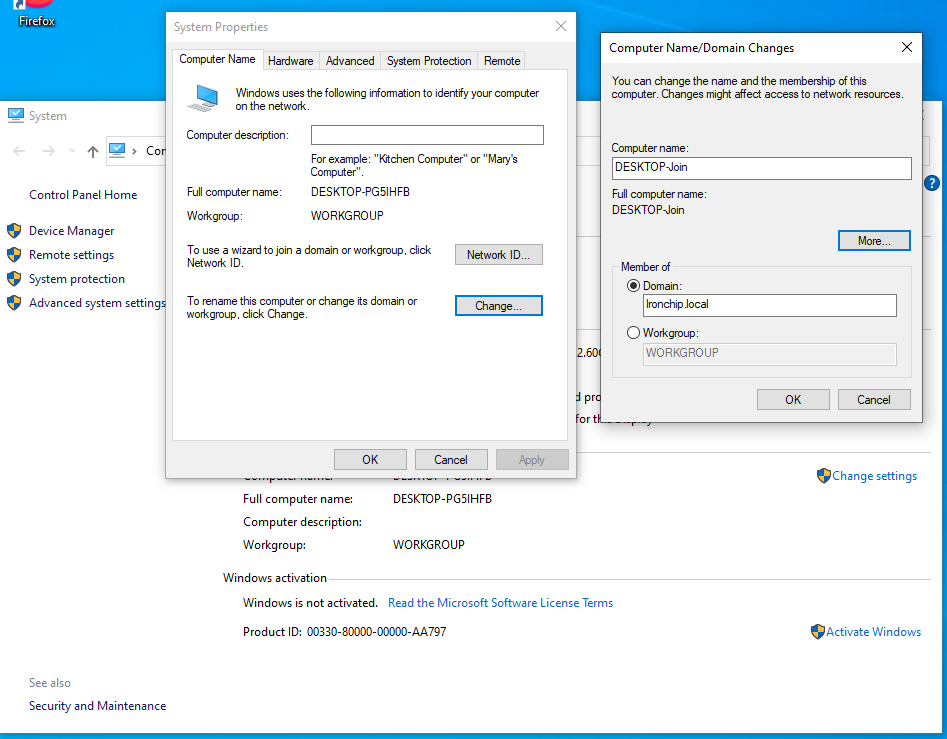
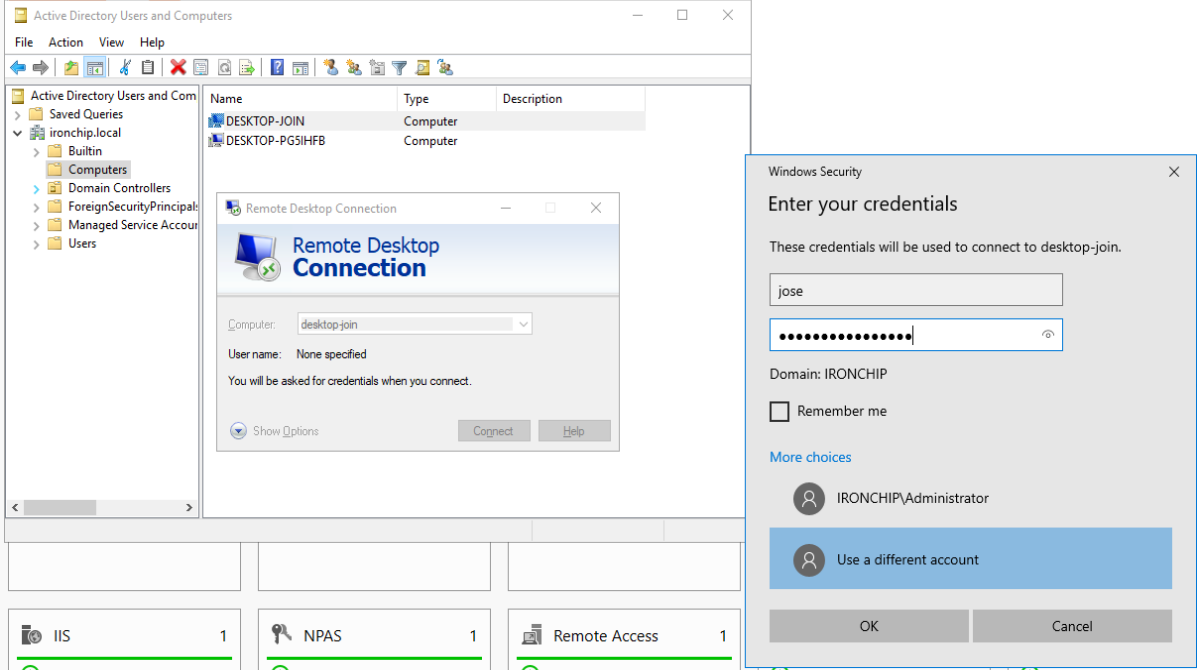
Now connect the machine to the active directory. In the This PC program, click on the right button and in the Computer name, domain, and workgroup settings section, click on Change settings. Once here, enter the name of the computer and the name of the domain to which it belongs.
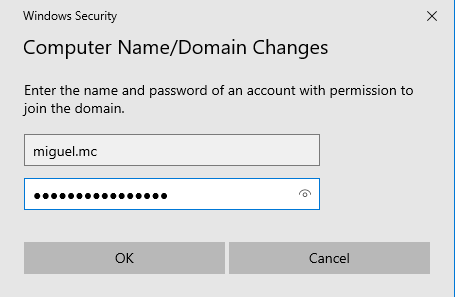
Changing this configuration will trigger the active directory login, in which the user and password belonging to the active directory will be entered.
After this, the machine will have to be restarted to log in with another user through Other User. This user will enter the same username and password that has been entered in the active directory.
Then we will make an RDP connection with the Remote Desktop Connection program, which will ask for the administrator’s credentials.
RD Gateway
RD Gateway Activation and Configuration
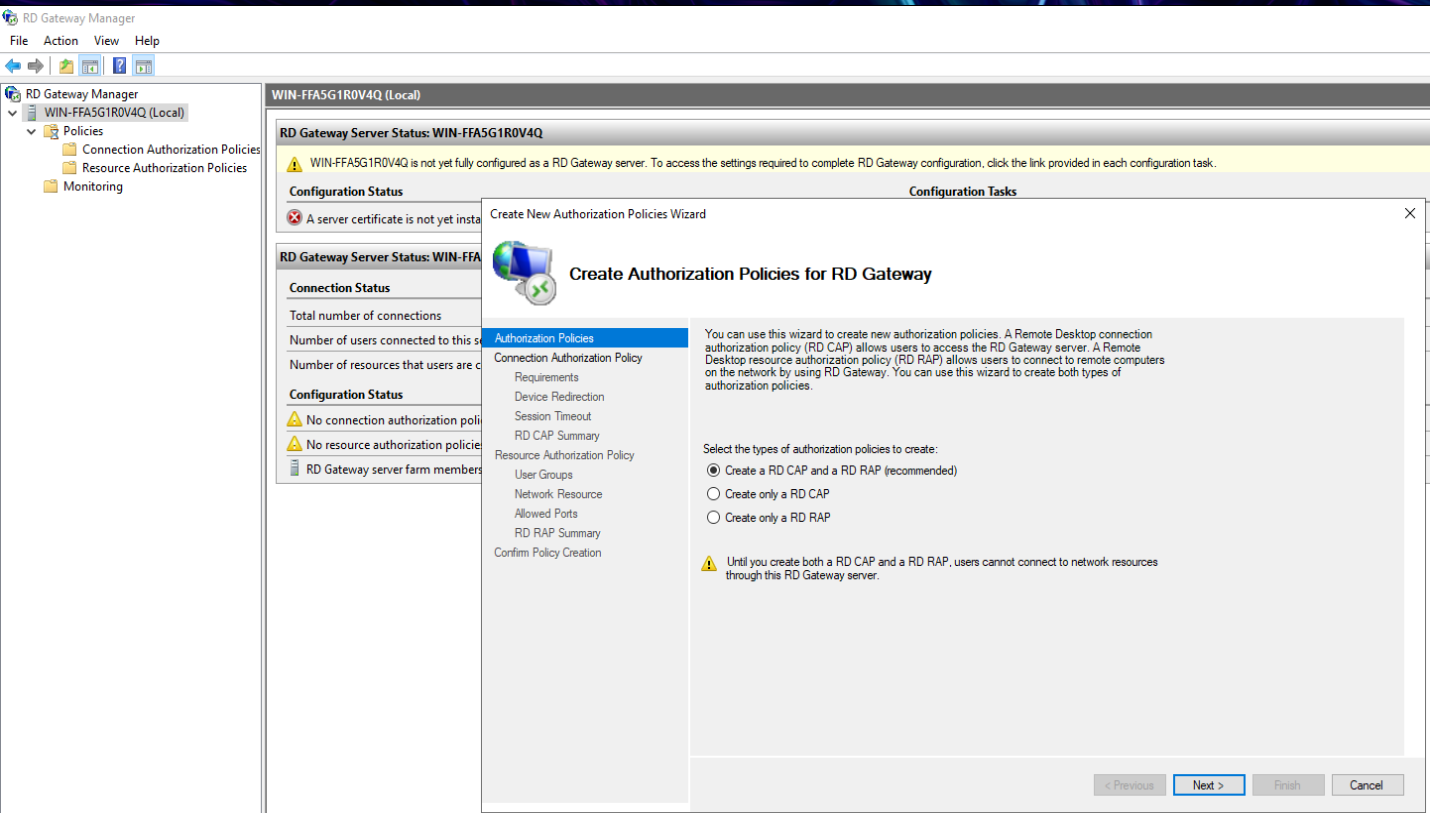
The first step is to enter the Remote Desktop Gateway Manager program from the administrative tools.
Right click on the Policies folder and select Create New Authorization Policies. When the new window opens, click on Create a RD CAP and a RD RAP and click on Next.
In the next window you will enter the name for RD CAP, e.g. Ironchip RDCAP. It is important that the name we assign to the RD CAP policy in this case (Ironchip RDCAP) is the same that will appear in the “External ID” of the service created in the Ironchip dashboard.
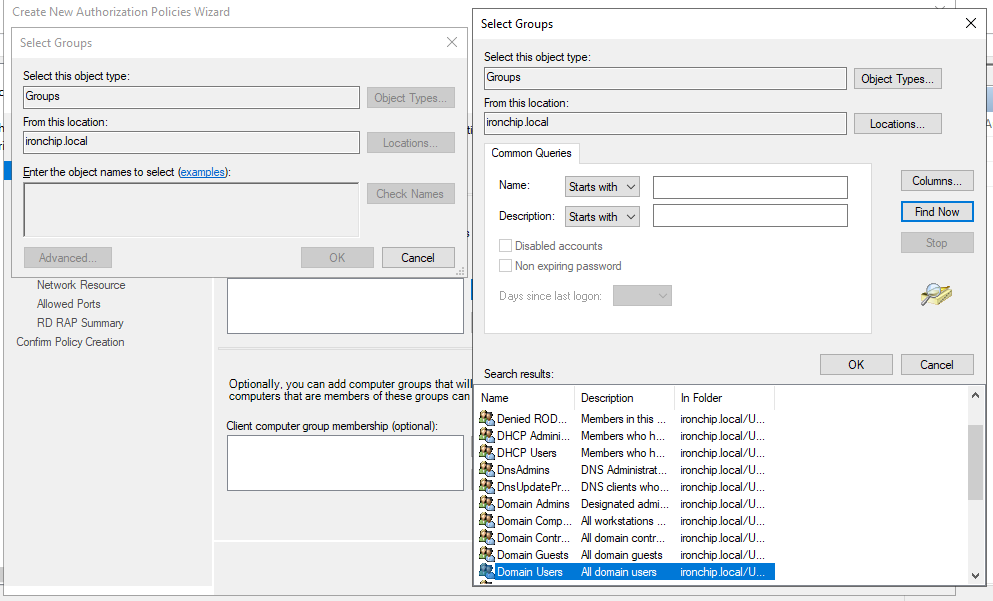
Click on Next. Then you need to add the requirement for domain users to be associated with RD CAP by clicking on Add Group…, then Advanced… and finally Find Now to see all those that can be selected. Click on Next.
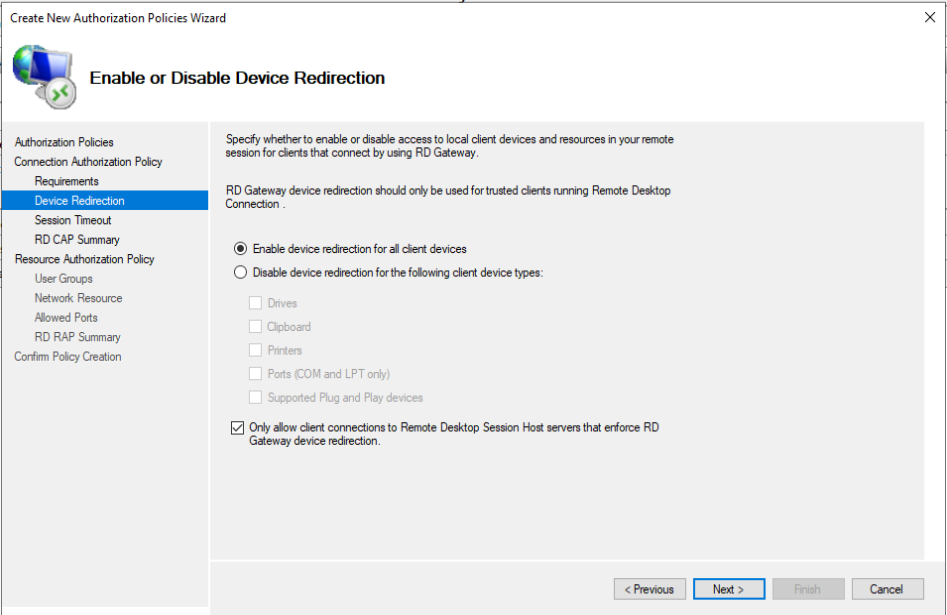
In the next window will select Only allow client connections to Remote Desktop Session Host servers that enforce RD Gateway device redirection. Click on Next 3 times to start the same process with RD RAP.
In the next window you will enter the name for RD RAP, e.g. Ironchip RDRAP. Click on Next. And then you have to add the requirement for domain users to be associated to RD RAP by clicking Add Group…, then Advanced… and with Find Now you can see all the selectable ones. Click on Next.
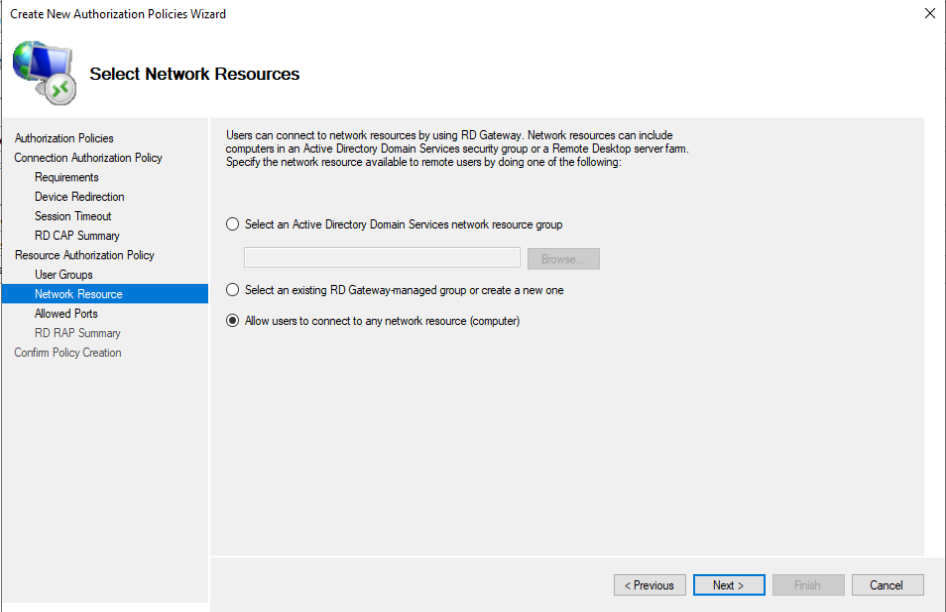
Finally, Allow users to connect to any network resource will be selected. Click on Next 2 times and Finish. When it is seen that RD CAP and RD RAP have been successfully created click on Close.
In the internal folders of Policies you will see them already created.
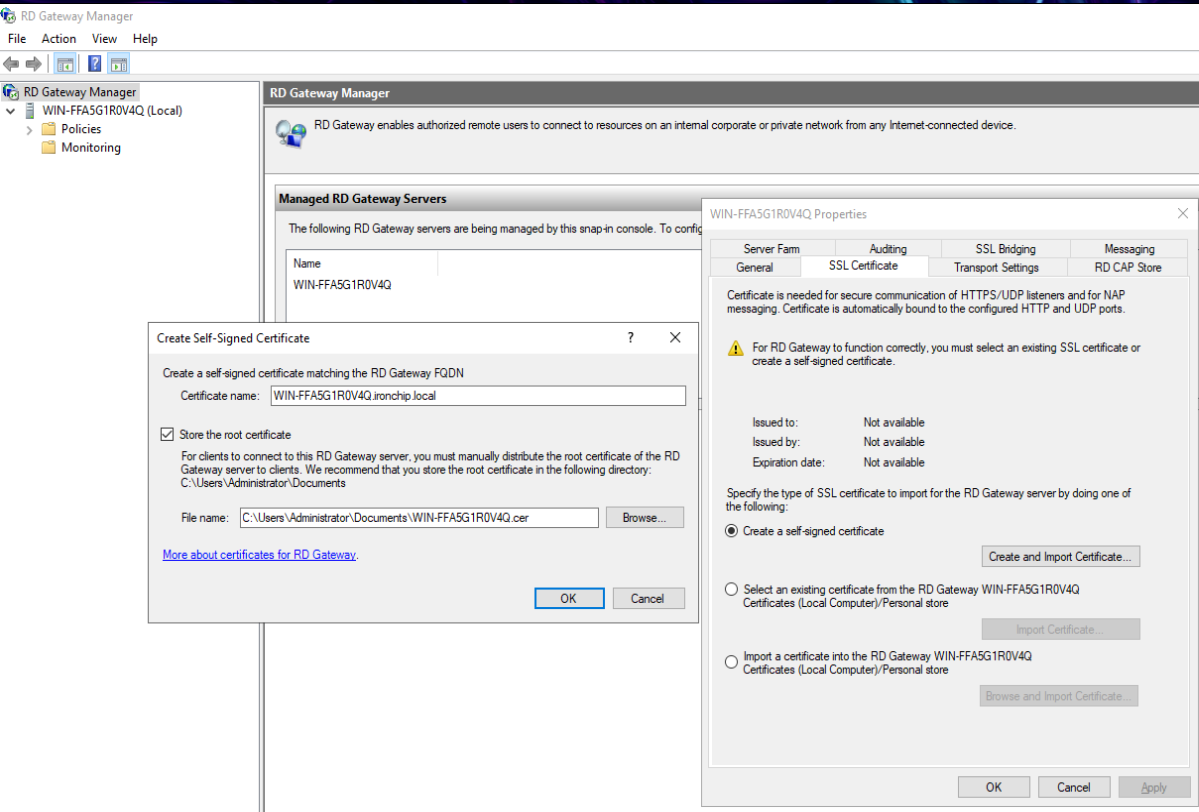
To continue with the configuration right click and select Properties. In the section SSL Certificate select Create a self-signed certificate; this will enable Create and Import Certificate…, click on it and press OK. This will save the certificate in the Documents folder of the computer.
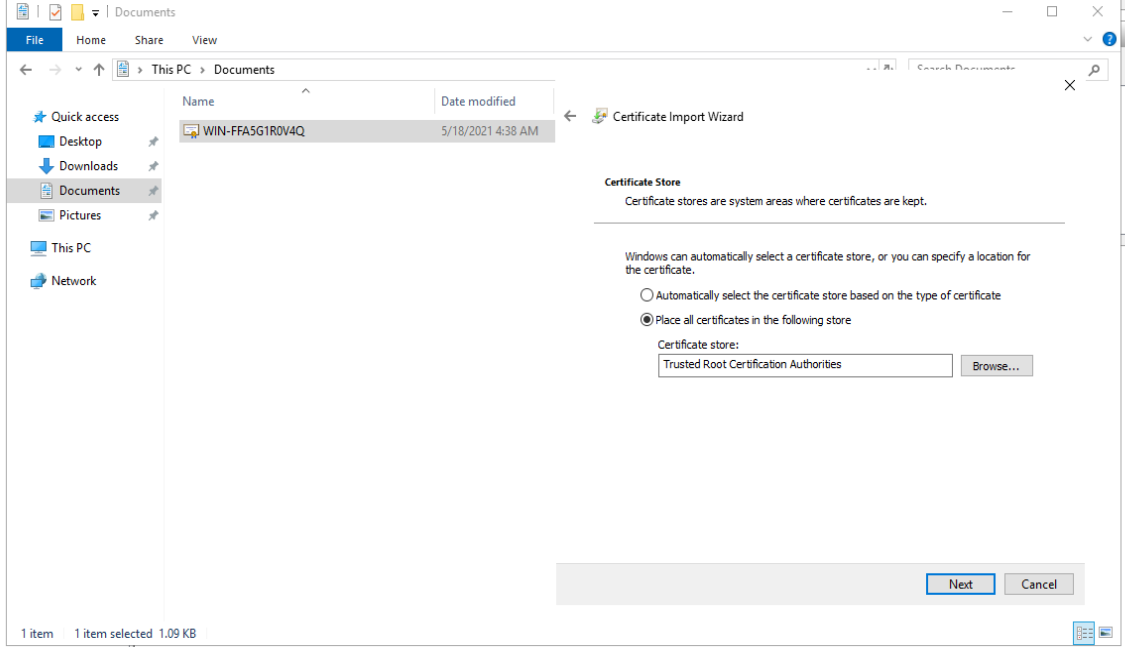
The certificate must now be installed on the machine. To do this, follow the steps below:
- Right click on the certificate.
- Select Install Certificate.
- Select Local Machine and then Next.
- Select Place all certificates in the following store and Browse….
- In the window that opens next, select the folder Trusted Root Certification Authorities and OK.
- Finally click on Next and Finish.
The certificate shall be affixed to all machines and the same process shall be carried out on all machines.
After this, the group policies will be generated using the Group Policy Management program from the administrative tools. The steps to follow are:
- Open Forest and Domains.
- Right click on ironchip.local and select Create a GPO in this existing domain, and link it here….
- Insert a name; for example, Ironchip.
- Right-click on the created GPO and select Edit.
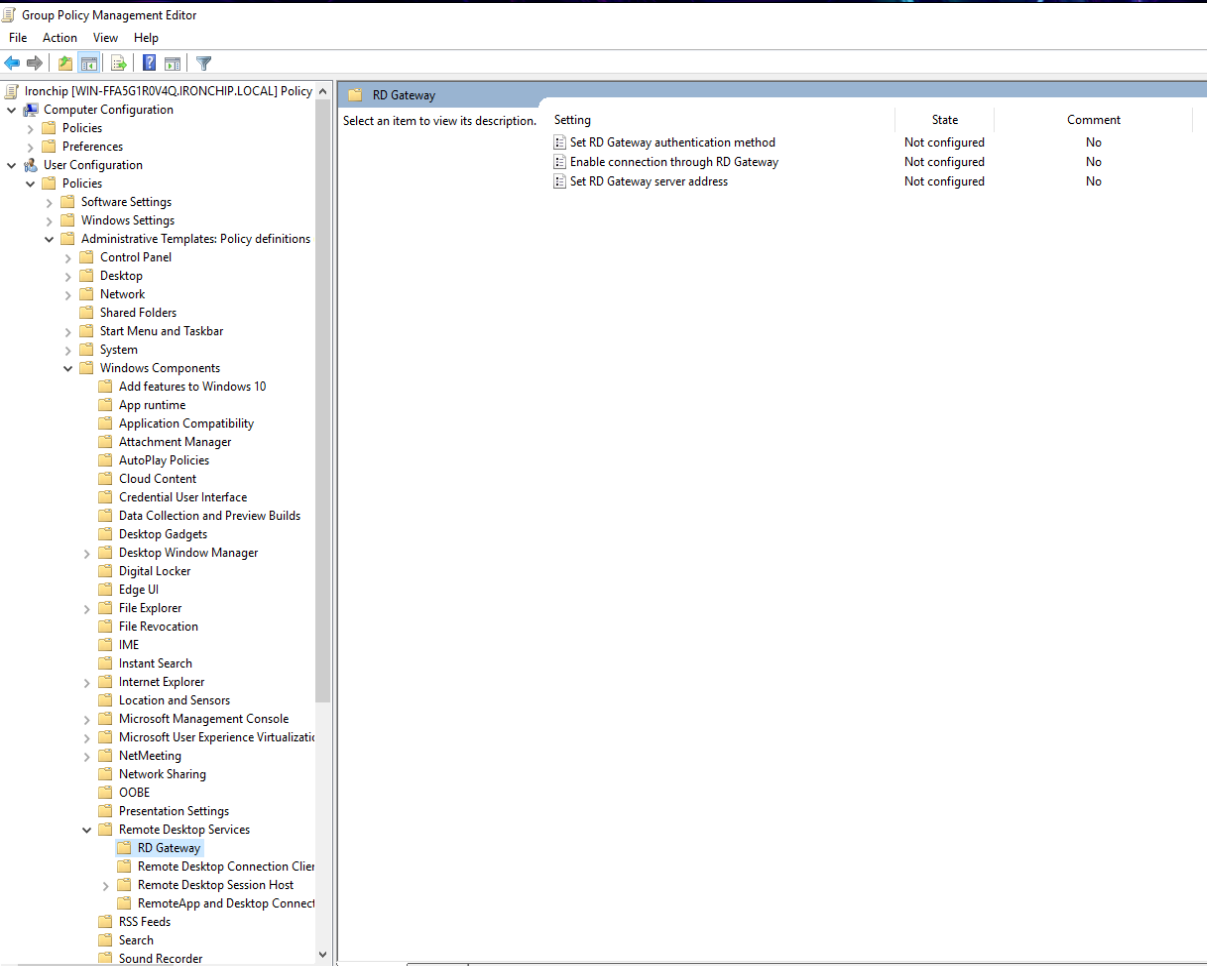
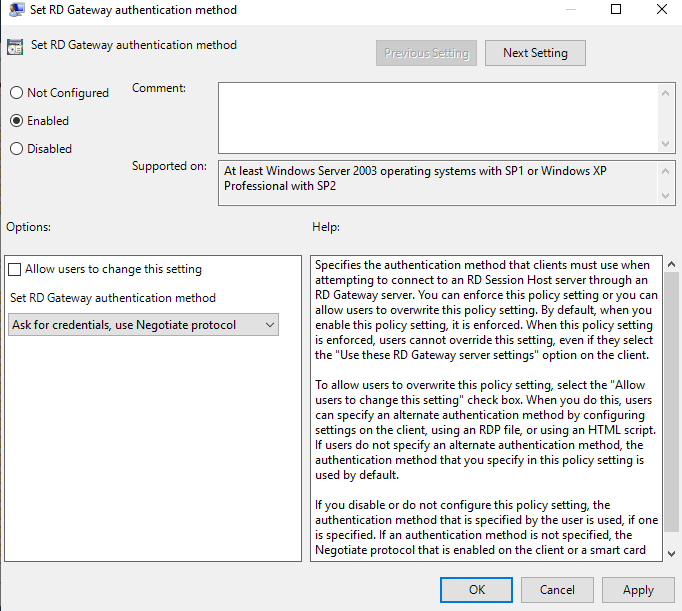
- The Group Policy Management Editor program will have opened. In this program, select User Configuration, Policies, Administrative Templates, Windows Components, Remote Desktop Service, RD Gateway.
- In this section select RD Gateway authentication method and enable it by clicking Enabled and select Ask for credentials, use Negotiate protocol.
- In the RD Gateway section, select Enable connection through RD Gateway and enable it by clicking on Enabled.
- In the RD Gateway section, select Set RD Gateway server address and enable it by pressing Enabled and enter an address, for example, 10.0.0.2.
- Finally run the command gpupdate in the PowerShell on all related machines.
Network Policy Server
Network Policy Server Configuration
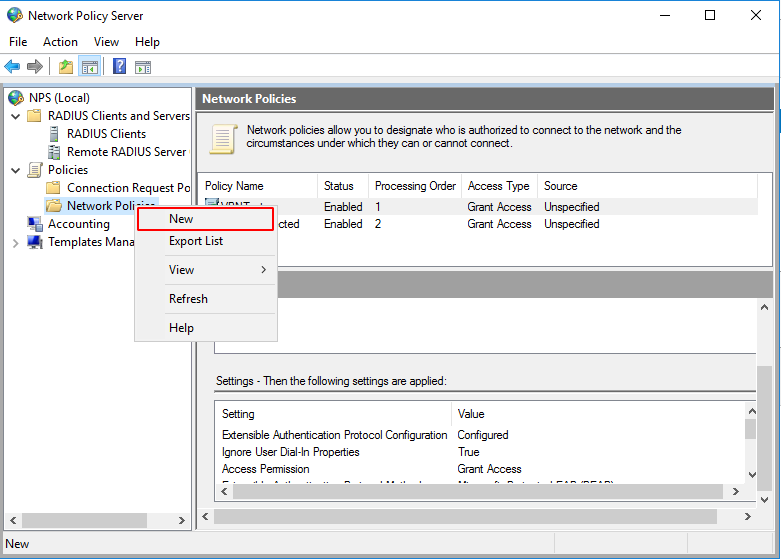
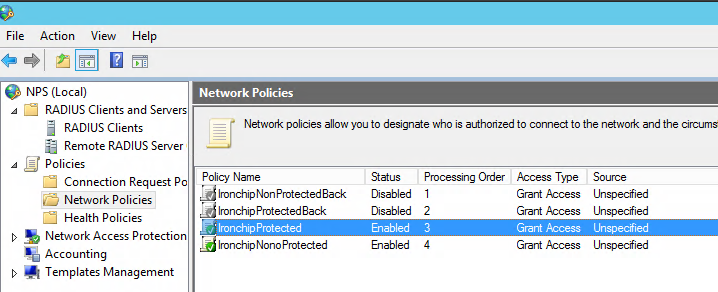
Ironchip Multifactor Authentication uses network policies to determine which user or group will be protected with Ironchip. To do this we must create a new network policy on the server.
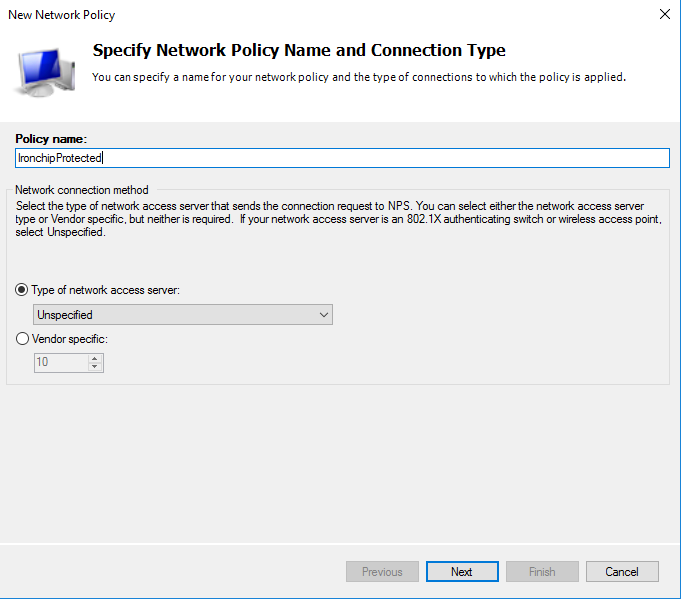
Provide a name for the policy. This name will be used when installing the NPS plugin, to determine which policy to protect.
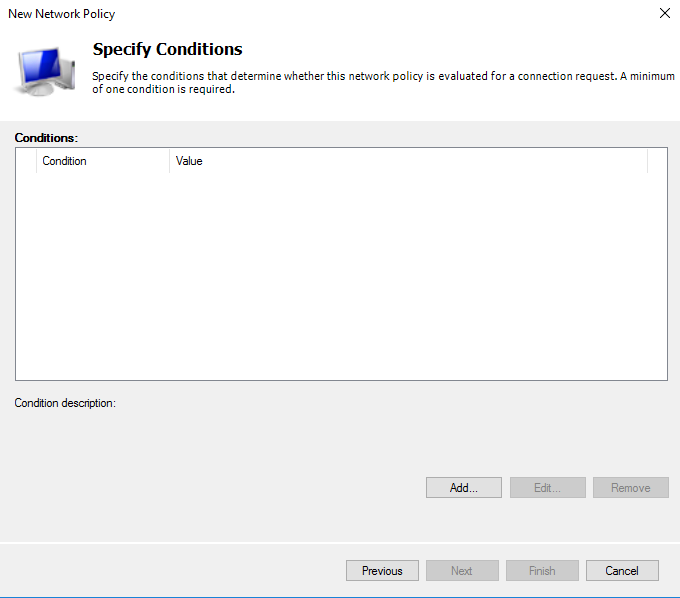
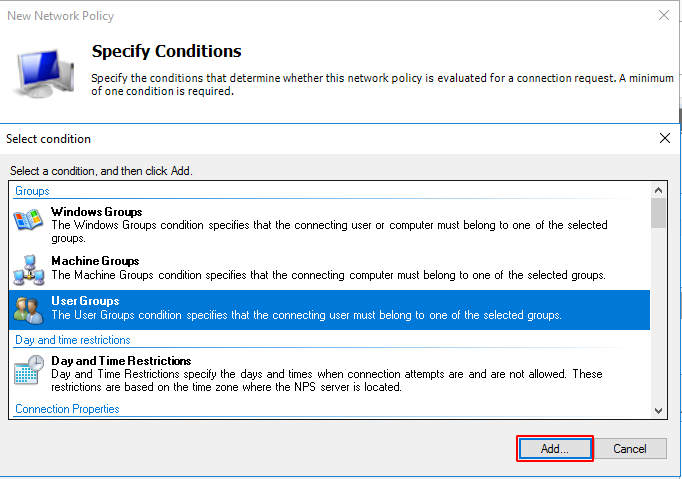
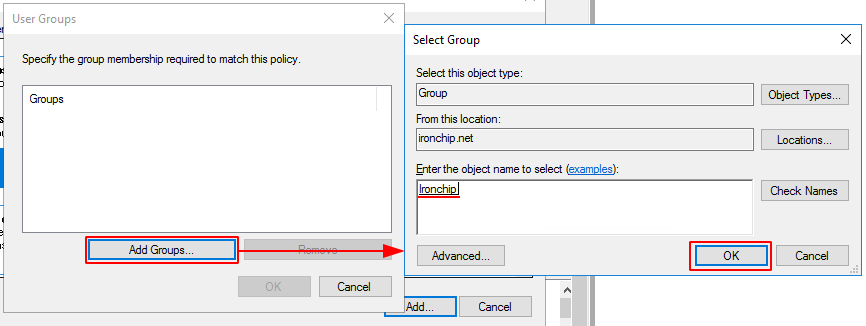
Click on Next. In the next window you will add all the conditions you want to determine, i.e. for whom and when the policy being created will be applied.
For example, it shall be determined that this policy shall apply when a user is a member of the Ironchip group.
Once added and configured you will see the following result. Click on Next.
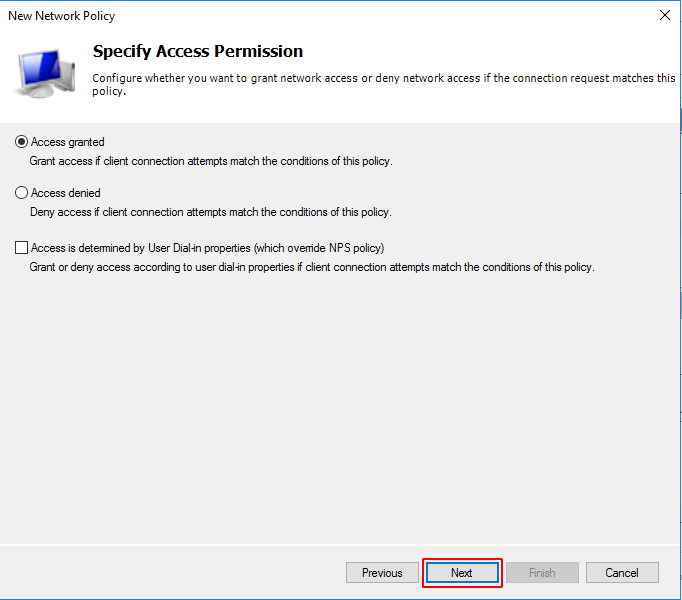
Select Access granted to grant access to users who meet the conditions of this policy. Click on Next.
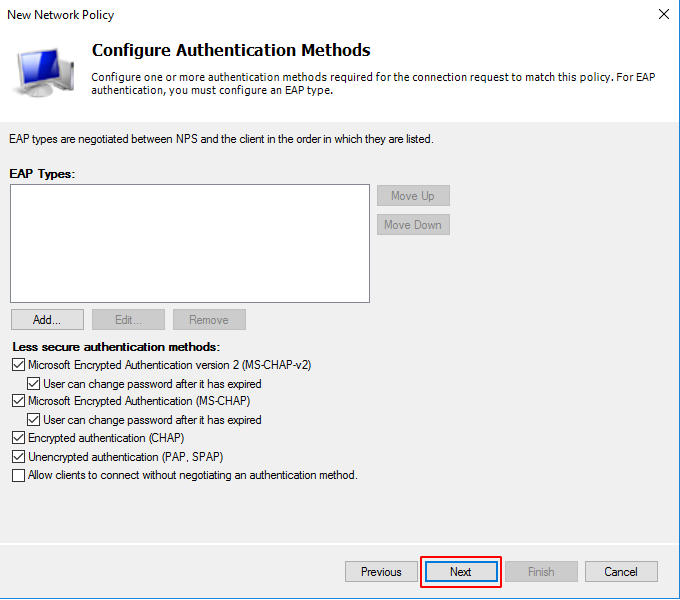
On the next screen, configure the authentication methods you will use. Click on Next.
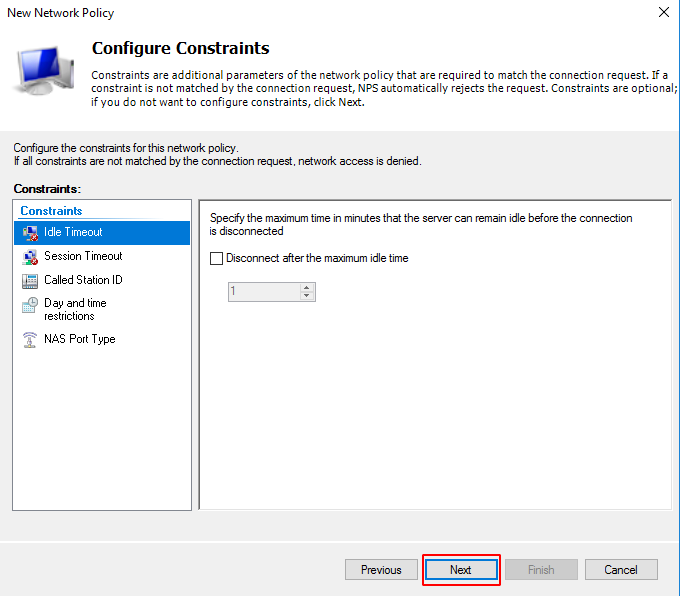
The next screen is for setting the restriction to automatically deny access if one of these restrictions is not met. Fill this in with the options you want. Click on Next.
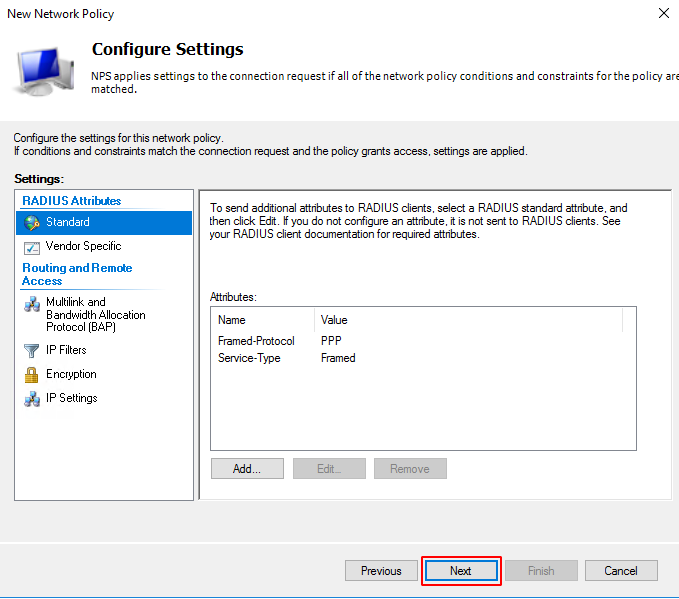
In the next screen you can add the settings that will be applied when the policy restrictions are met. Click on Next.
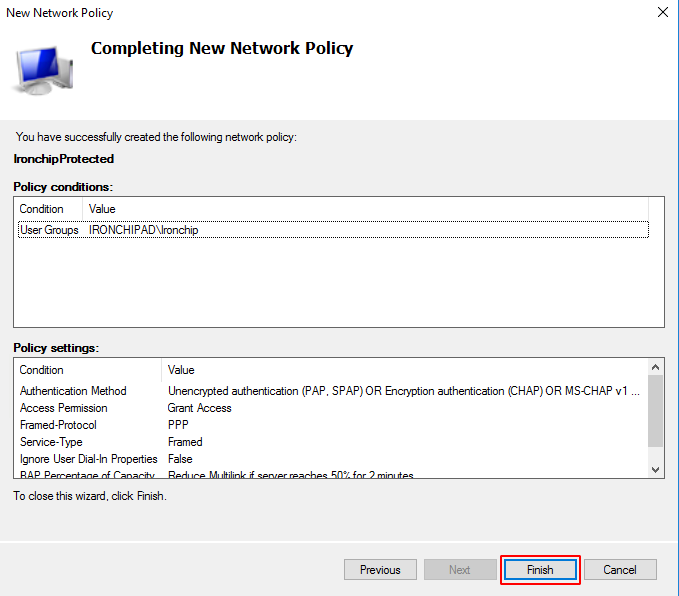
The last screen is a summary of the selected configuration. Check that everything is OK and click on Finish.
You have added the network policy and everything is ready to create the service and install the NPS plugin.
Application
Create New Application
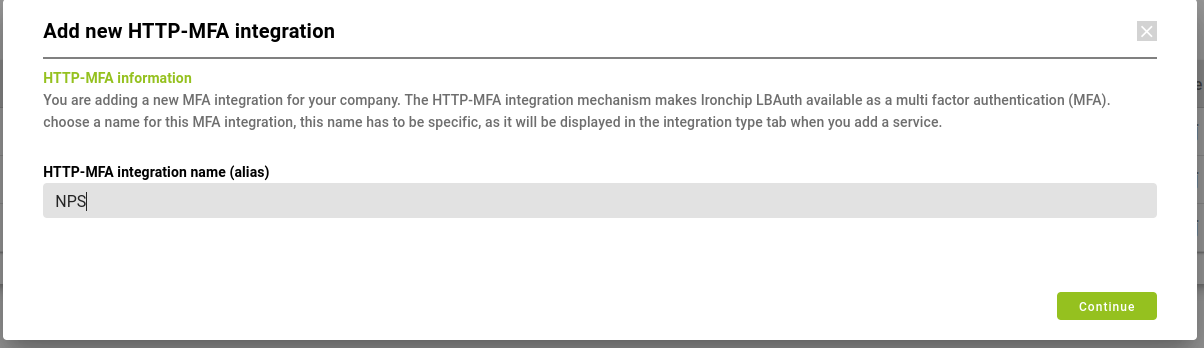
Once you are part of Ironchip, log into your Ironchip Lbauth Control Panel. To add the NPS plugin with Ironchip go to the Settings in the top right menu and add a new HTTP-MFA integration called NPS.
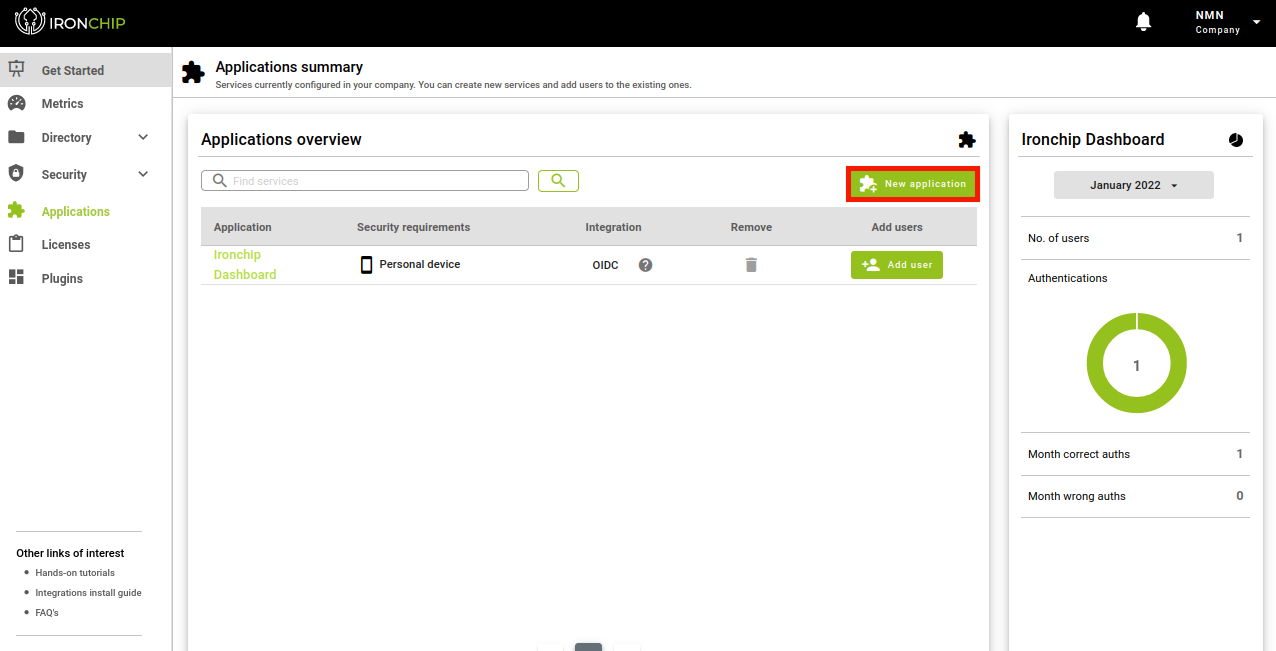
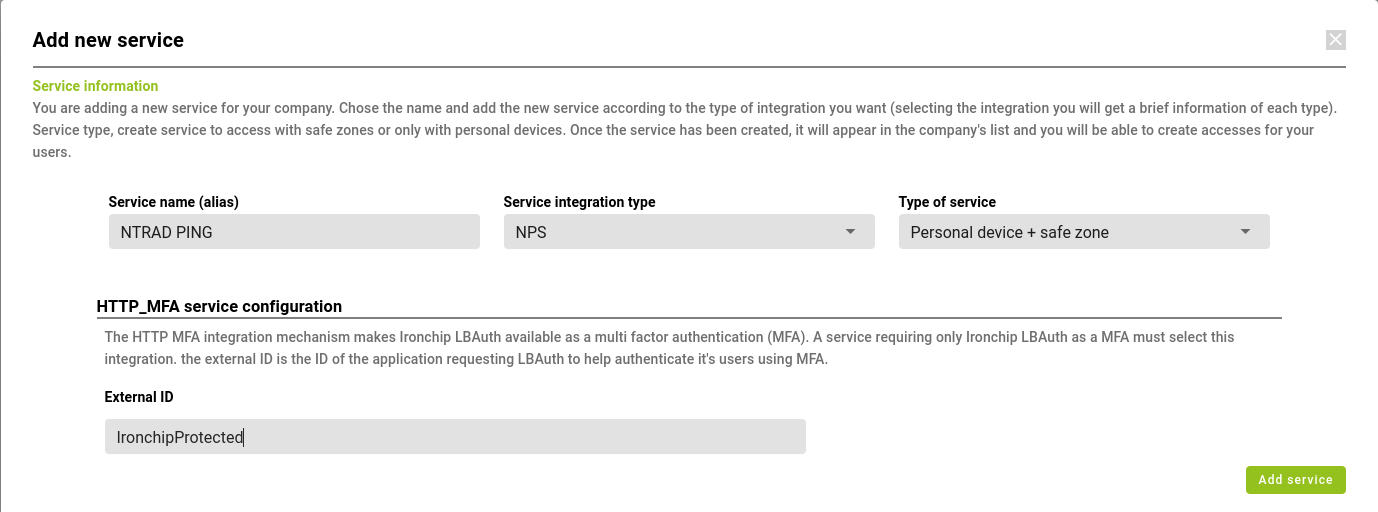
Then go to the Applications section and add a new one with the integration type created earlier:
The External ID must be the name that has been assigned to the protected group, in this case IronchipProtected as can be seen in the image below.
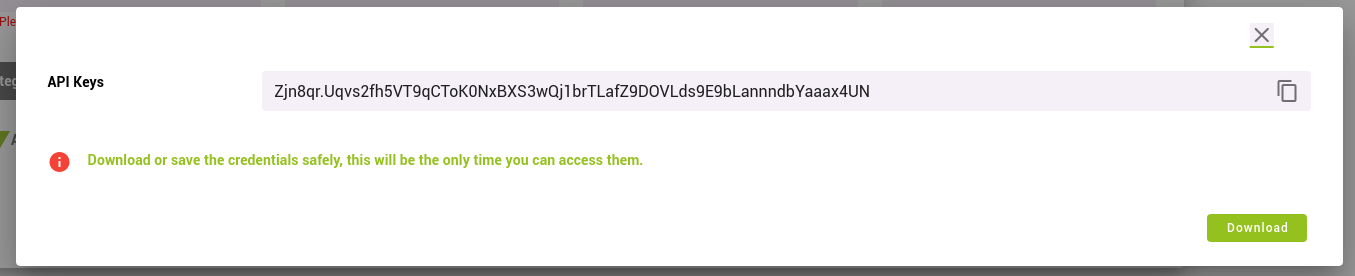
When you click Add Service you will receive a new API Key.
Be careful this window will only be visible this once, so you must copy the value of this window before closing it.
Once the last window is closed, you will see the new service added to the list.
Plugin installation
Installing the NPS Plugin
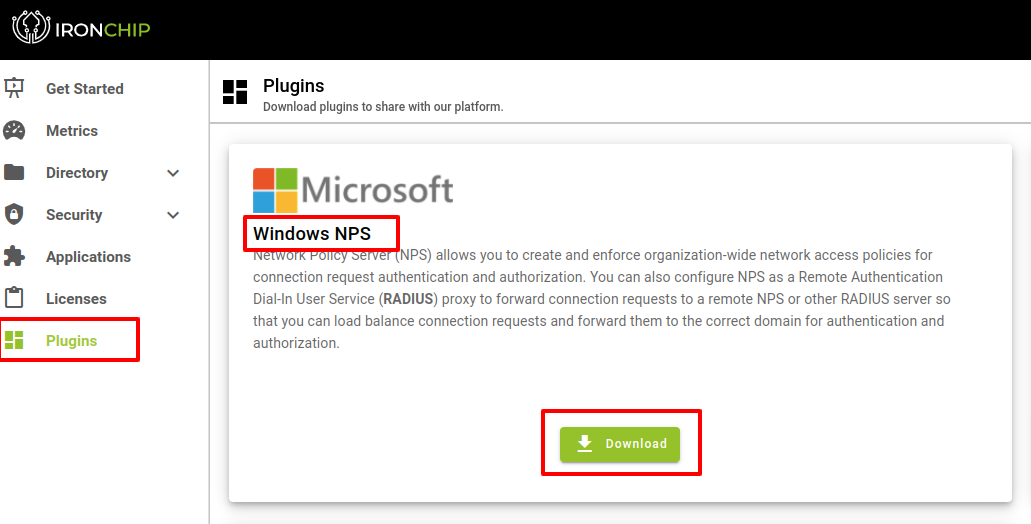
To install the plugin, you need the file IronChip Windows NPS, which can be downloaded from Plugins section in Ironchip Dashboard.
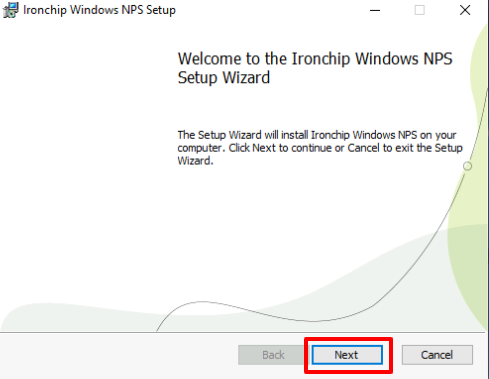
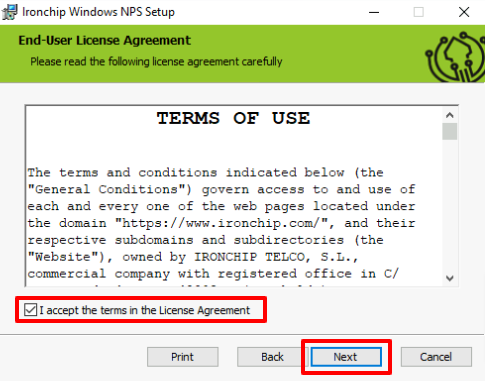
After downloading the plugin you will proceed to install it.
Click Next, on the next screen you will accept the terms of use, and click Next again.
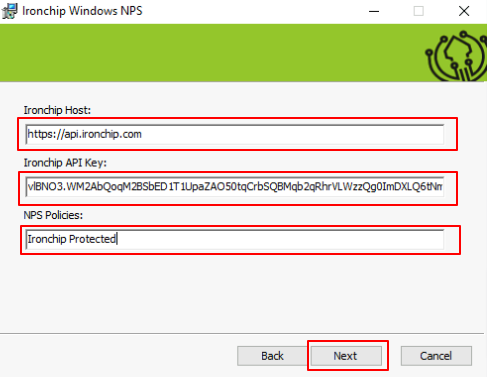
Next window you will need to fill it with the following information:
- Your Ironchip host. If you are using our cloud solution, it will be api.ironchip.com. If not, please provide your custom host.
- Your company’s API Key achieved when creating the service.
- The network policy name you wish to protect with Ironchip NPS. In the example the created policy, IronchipProtected, will be used.
- Then click on Next to continue.
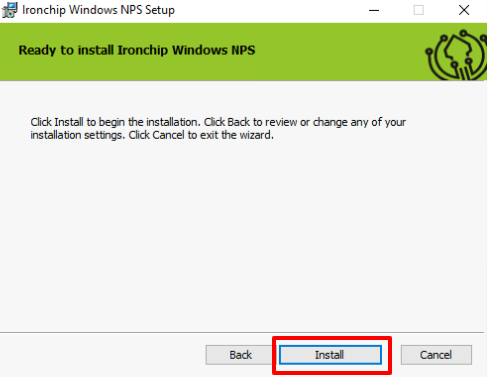
Once in the following screen and with all parameters configured correctly, click Install
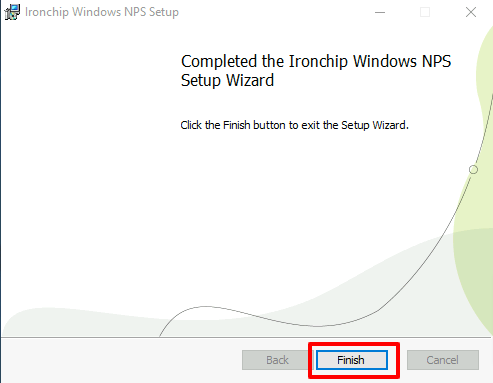
If everything has been configured correctly and the installation has been successful, you will see the following screen. Finally, to finish the installation, click Finish.
Test NPS Plugin
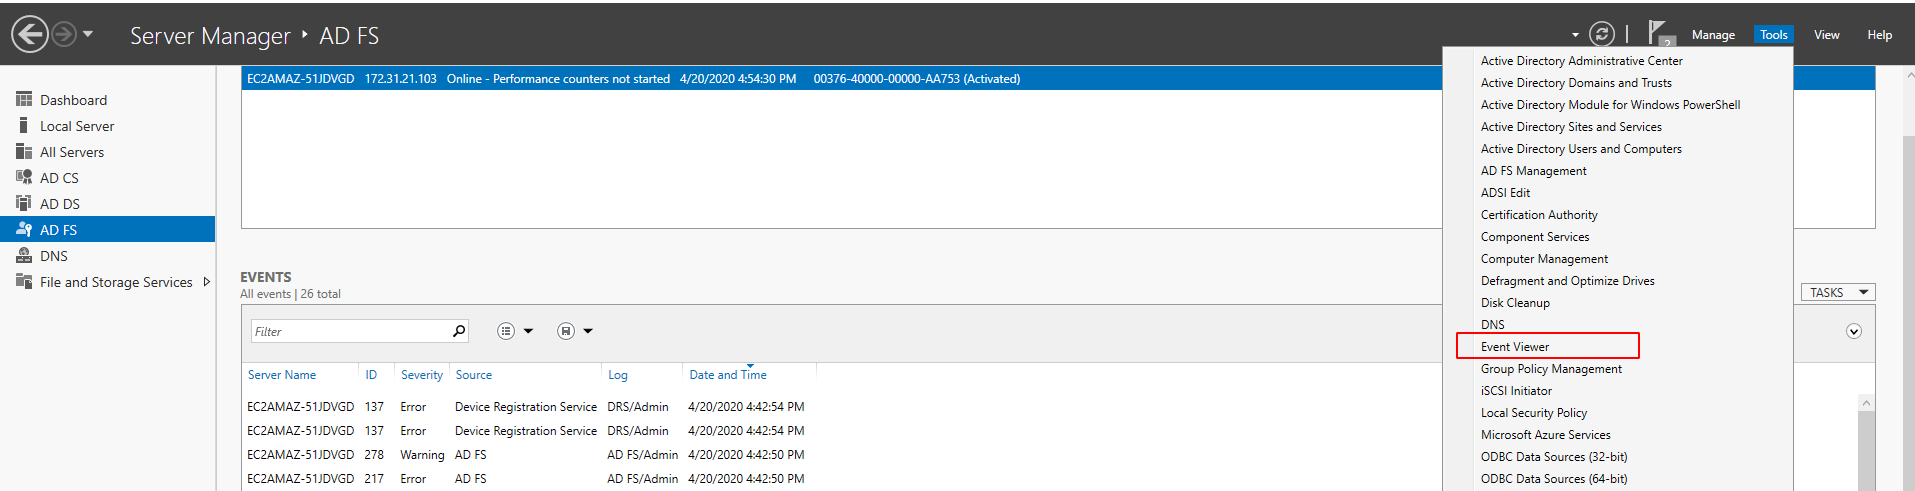
Access the Event Viewer to view the IronChip NPS plugin logs.
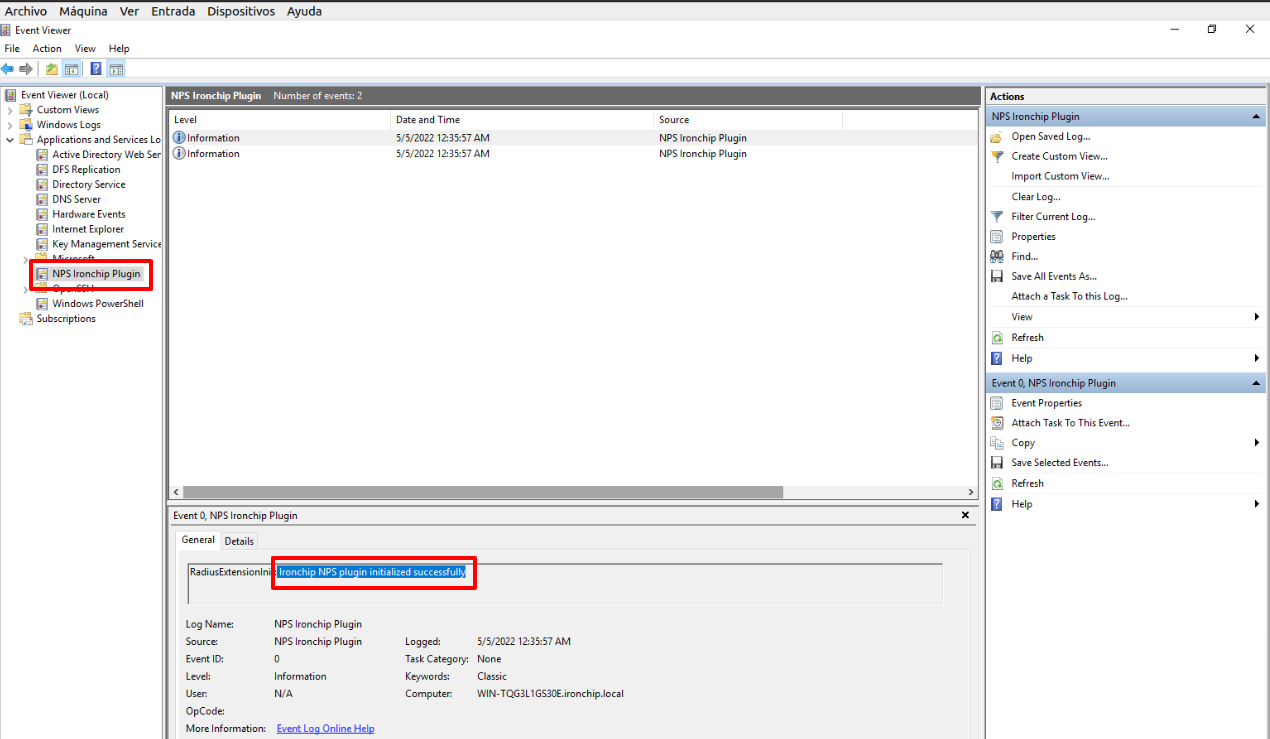
If everything is OK, you should see NPS Ironchip Plugin in the list of applications and services logs. Click on it, and if the plugin is installed you should see Ironchip NPS plugin initialized successfully. in the logs as you can see here:
Note: If you get the message Unable to load IronChip license key. Check that it is the correct license and try again. If the problem persists, contact IronChip support for assistance.
Authentication
Authentication in the Protected Service
video


LDAP
Prerequisites
Create the company
Email addresses and names of the users to be added. The person to be added will be registered first. This will be done in a meeting.
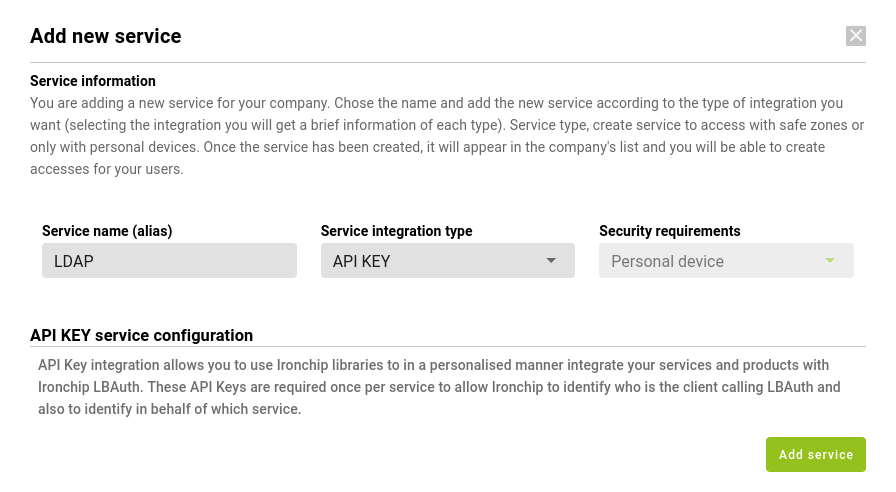
Application
Add Application to Company
In the Applications section you can see all the protected applications that have been added to Ironchip and their features. To add a application, click on New Application, which will open a new window.
In the new window you will have to choose the new application, it can be one of those that appear in the list or a customized application, for which you will click on Custom Application. A new window will open.
In this window you will have to enter the data of the new application, if you have chosen one from the list the name will be predefined, otherwise you will have to enter it. In addition, the type of integration is Api Key and the security requirements. The latter can be of two types which will be used to access the selected service:
- Personal Device.
- Personal device + secure zone.
When all the fields are filled in, Add Service will be clicked and the service will be displayed in the corresponding section.
Important: Save the Api Key that is returned when creating a service. This information will only appear this time, so you will have to download it and enter it later when downloading the plugin.
Access
Add User to Application
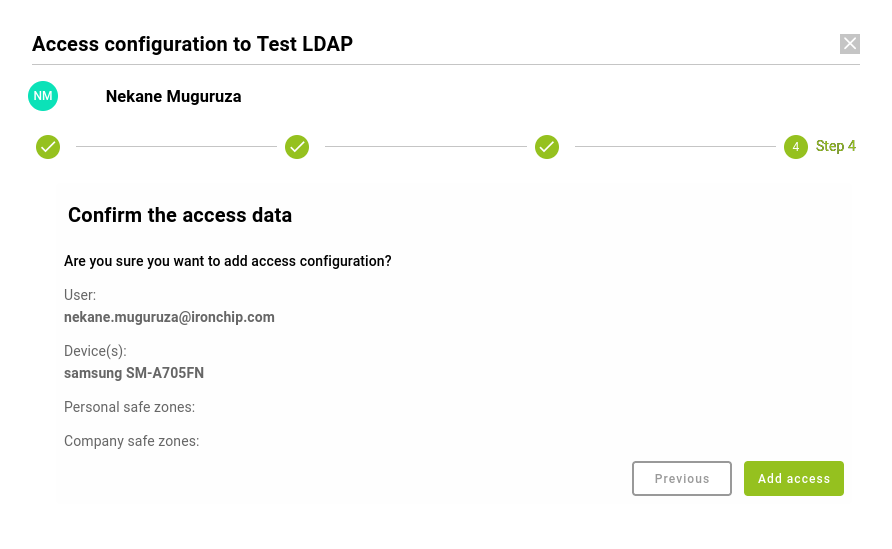
To add a user to a service, start from the Applications section, select the service to which you want to add one or more users. Once in the information page on a service, click on Add User in the Users with access to … card.In the opened window select the user(s) you want to add and click on Continue.
The next step is to configure access to the service. To do this, the following steps must be followed:
The user name should be the same as the one with which one will authenticate.
- Verify the username and security requirements, the first one is modified by clicking on the pencil icon. Click on Continue.
- Select the personal device to be used for the authentication process. Click on Continue.
- Select the secure zones both personal and shared that will be used to access the selected service. Click Continue.
- Verify all the configurations previously selected and click Add Access.
The user will have been added to the service with the selected configuration. This can be changed at any time.
Plugin
Overview
LDAP Proxy Plugin
Download
The Ironchip LDAP Proxy service can be found in the Plugins section of Ironchip’s Location Based Authentication administration dashboard.Installation
To install the LDAP Proxy, follow these steps:
Move the downloaded executable file to a system folder suitable for running services.
Call the executable with the “configuration flag”, in order to generate the default configuration file:
ldap-windows.exe configurationOnce the configuration file has been set up (follow the configuration section), install the service as follows:
ldap-windows.exe service installOnce installed, the service can be started:
ldap-windows.exe service startConfiguration
The configuration file can be modified at any time, in order for the changes to apply, restart the service:
ldap-windows.exe service restartThe configuration file has the following configurable properties:
- Path: The configuration path, defaulting to the /.json
- LDAP:
- server_address: the FQDN of the LDAP domain controller.
- server_port: the port of the LDAP domain controller.
- protected_group: the group name that is protected using Ironchip LBAuth.
- network: the communication scheme used by the client, currently only “tcp” is supported.
- base_dn: the base DN for the Proxy to be attached to.
- Proxy:
- server_address: the address in which the proxy will be serving.
- server_port: the port in which the proxy will be providing service.
- network: the communication scheme used by the proxy, currently only “tcp” is supported.
- Ironchip:
- ironchip_api_key: the API key generated for the Ironchip Service associated.
- ironchip_host: the direction in which your assigned Ironchip environment is running, usually: “https://api.ironchip.com”
An example configuration file:
{
    "ldap": {
        "dirección_servidor": "localhost",
        "server_port": 389,
        "tls_enable": false,
        "key_file": "",
        "cert_file": "",
        "time_out_seconds": 5,
        "red": "tcp",
        "base_dn": ""
    },
    "proxy": {
        "server_address": "0.0.0.0",
        "server_port": 4389,
        "tls_enable": false,
        "key_file": "",
        "cert_file": "",
        "protected_group": "",
        "time_out_seconds": 5,
        "network": "tcp"
    },
    "ironchip": {
        "ironchip_api_key": "",
        "ironchip_host": "<https://api.ironchip.com>"
    }
}
Monitoring
The running Ironchip LDAP Proxy register it’s events in the windows event viewer, it is registered as “Ironchip LDAP Proxy”.Uninstalling
In order to uninstall the service, use this command:ldap-windows.exe service uninstallUser synchronization
In order to synchronize the users between the LDAP and Ironchip LBAuth, the proxy provides a tool, execute:ldap-windows.exe sync-users -ldap-user <user-used-for-bind> -ironchip-user <ironchip admin with access to the dashboard>Once the import has been completed, all the users have been created in Ironchip.
User group synchronization
To synchronize the users belonging to a group, the sync-users command can be configured as follows:
ldap-windows.exe sync-users -ldap-user <user-used-for-bind> -ironchip-user <ironchip admin with access to the dashboard> --ldap-search-filter "(&(objectClass=person)(memberOf=<group full DN>))"as an example if the user is in the “VPNAuthorized” group with a DN of “CN=VPNAuthorized,DC=ironchip,DC=com” then the command would be:
ldap-windows.exe sync-users -ldap-user <user-used-for-bind> -ironchip-user <ironchip admin with access to the dashboard> --ldap-search-filter "(&(objectClass=person)(memberOf=CN=VPNAuthorized,DC=ironchip,DC=com))"Note also that the sync-users command also provides a “–ldap-search-dn” flag that by default points to the DN configured in the configuration file but can be overwritten by setting this flag appropriately.
Protected groups
Protected groups generation
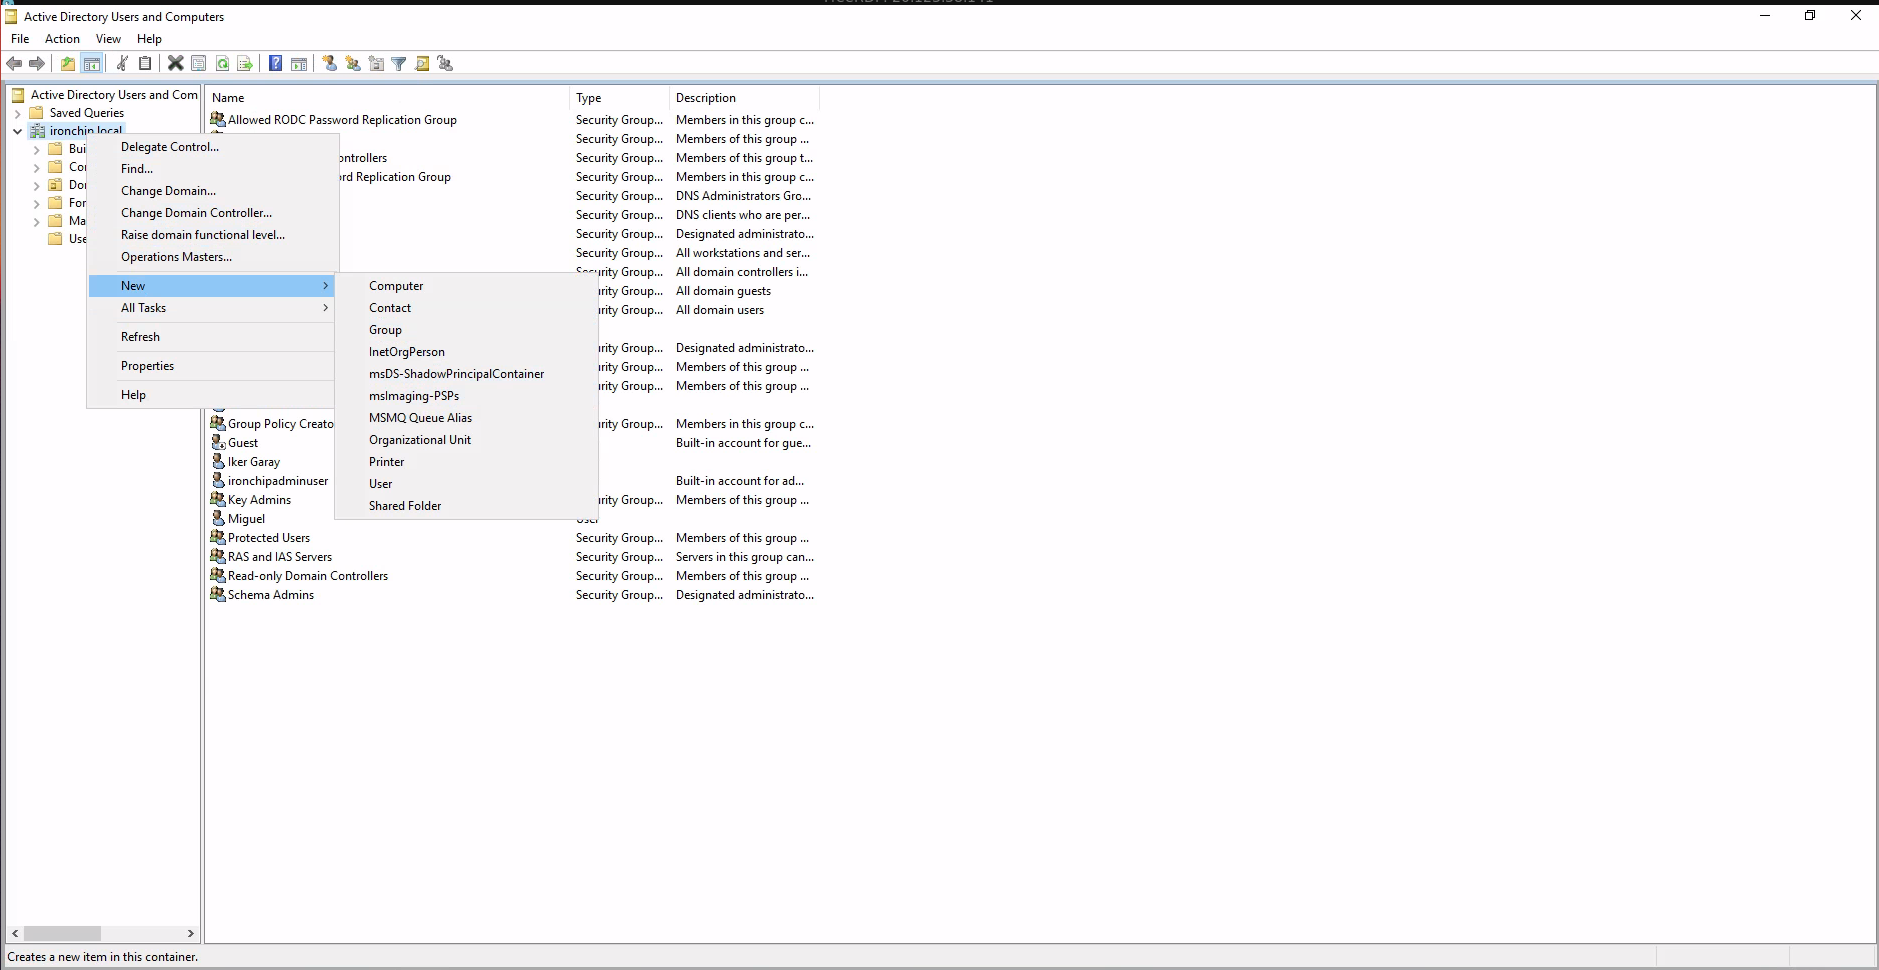
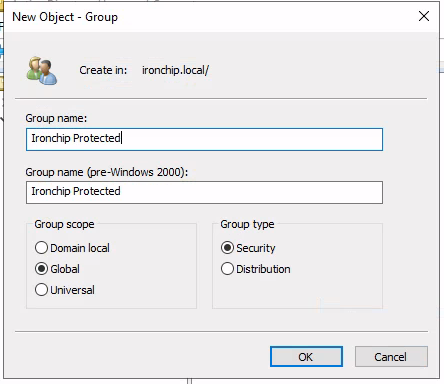
In order to generate a protected group, just create a new group by right-clicking on the domain controller and then selecting New →Group:
Create the group with an specific name:
The selected group name must match exactly with the “protected_group” configuration property in the LDAP Proxy configuration, check configuration section.
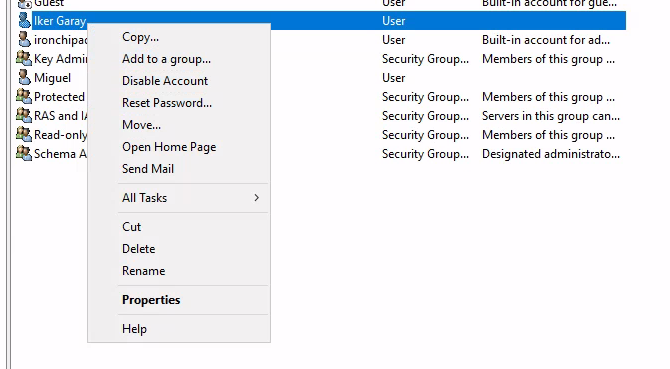
Once created, in order to add a user to a group, right click the user, and select Add to a group…
Then, select the group names to select:
And click Ok. The user is now protected with Ironchip.
Authentification
LDAP Admin Authentication
The following steps are performed in the LDAP Admin application:
A connection will be initiated by pressing Start and Connect.
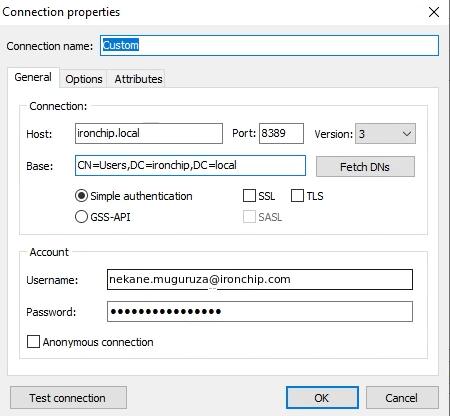
Next, right click on Custom and select Properties.
The properties have to be:
- Host: ironchip.local
- Port: 8389
- Username: must be the one used in the service configuration.
Click OK.
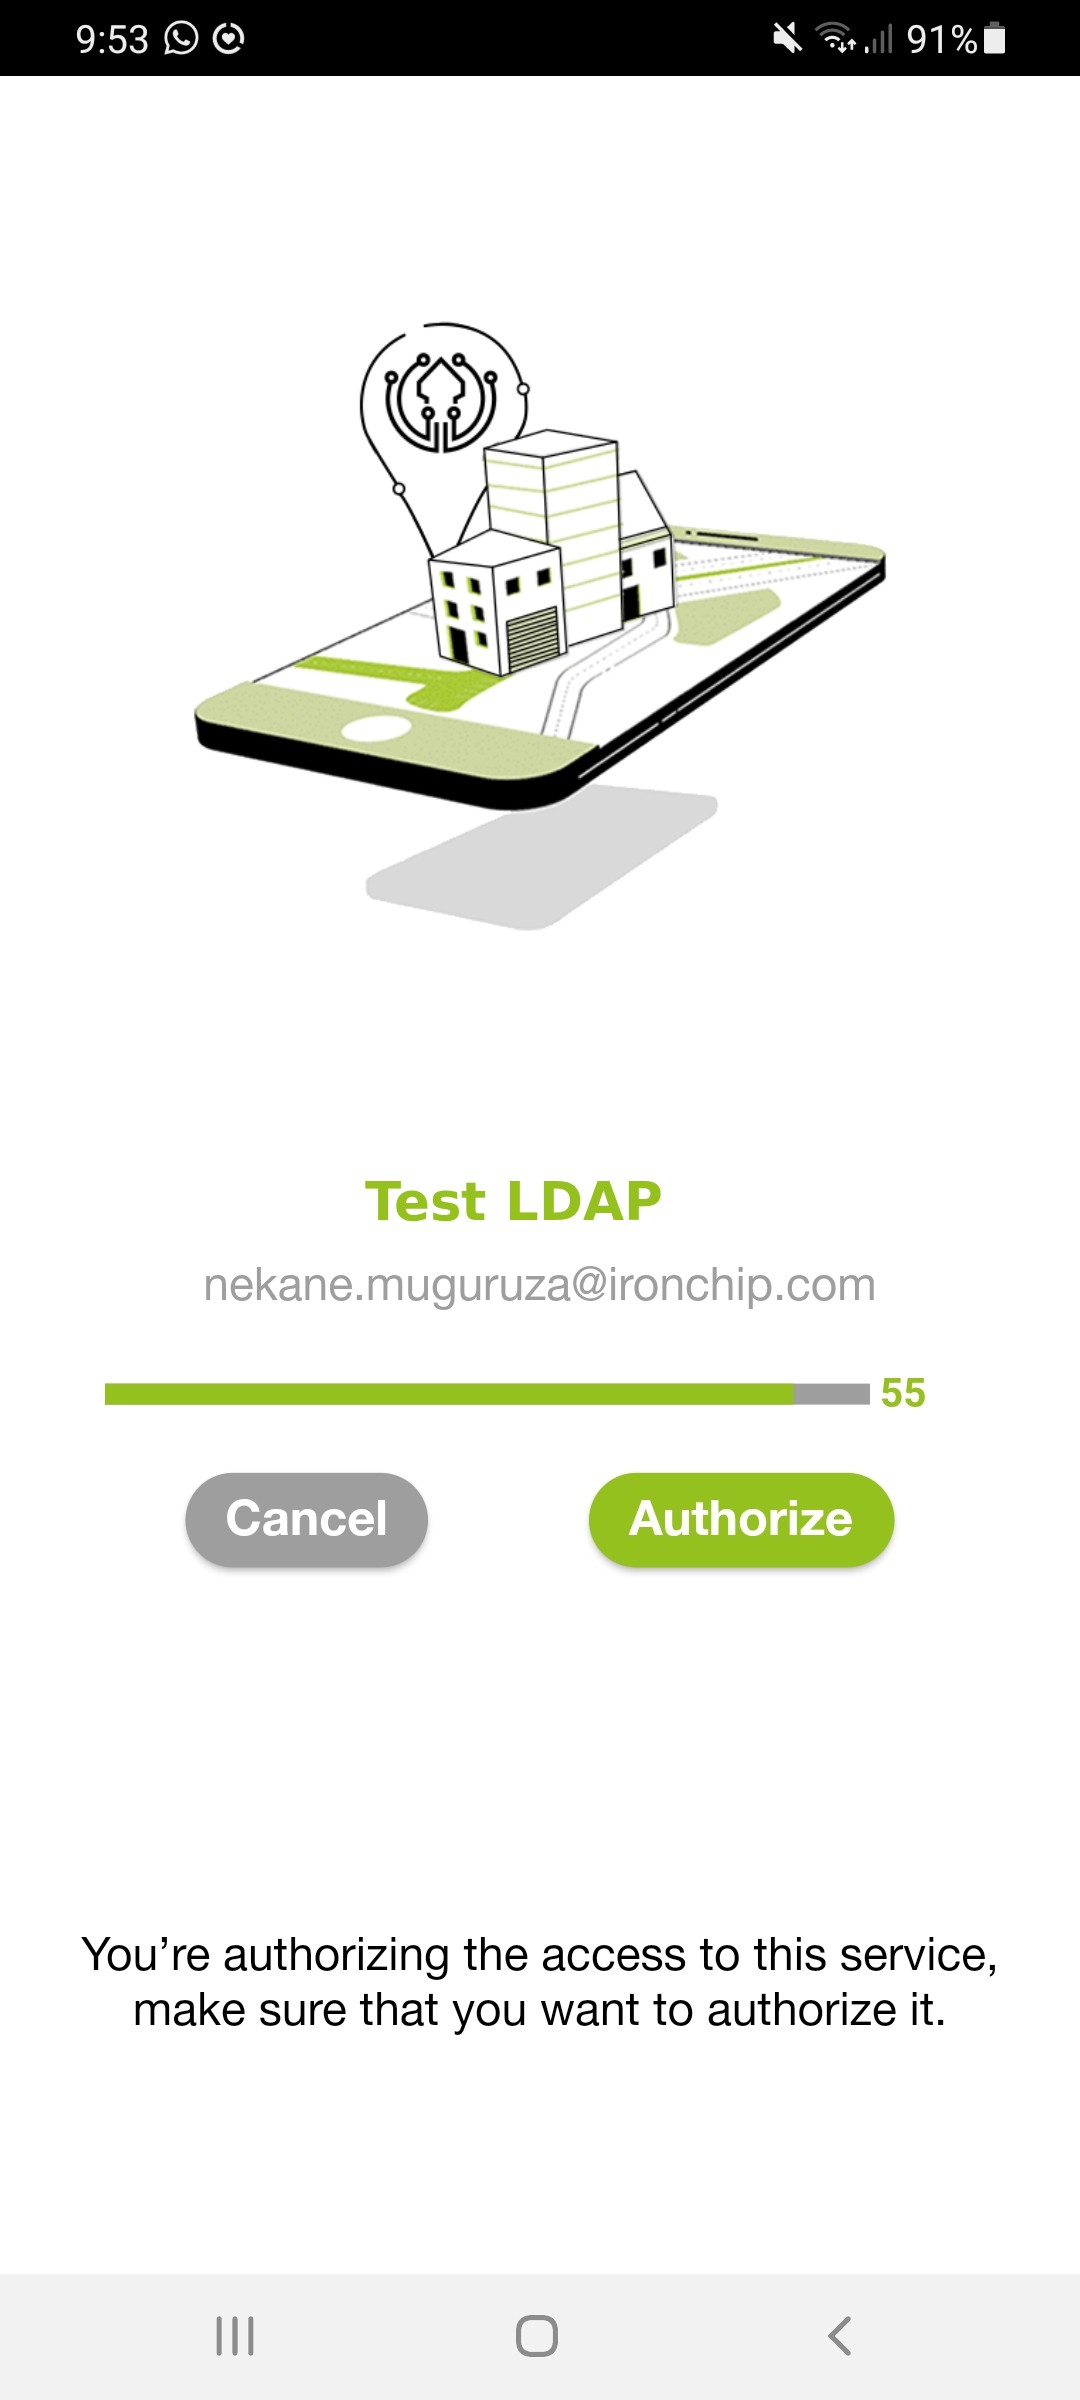
Press OK again to start the authentication.
The user will receive a notification of the service created and will authorize access to it.
This authentication process will take a few seconds. When it is done, you will see that the user has been successfully authorized.